


Making elements appear based on their scroll position is a very popular design choice when building web pages but it usually involves using a plugin or library. In this tutorial you’ll learn how to implement animation on scroll using vanilla JavaScript and CSS.
The main advantage of using a custom implementation (as opposed to a library) is that it allows us to optimize our functions for accessibility and performance.
Scrolling Animation Demo
Here’s an example of how animating elements on scroll works:
Our implementation relies on CSS for animations and JavaScript to handle triggering the necessary styles. We’ll start by creating the layout.
1. Define the Page Structure
We’ll create the layout of our page using HTML and then assign a common class name to the elements we want to animate on scroll. This class name is what we’ll be targeting in JavaScript.
In the demo above, the elements were assigned the class name js-scroll so the HTML looks something like this:
1 |
<header>
|
2 |
<!--this is where the content of the header goes-->
|
3 |
</header>
|
4 |
<section class="scroll-container"> |
5 |
<div class="scroll-element js-scroll"> |
6 |
</div>
|
7 |
<div class="scroll-caption"> |
8 |
This animation fades in from the top. |
9 |
</div>
|
10 |
</section>
|
2. Styling With CSS
CSS does a lot of the heavy-lifting as it determines the style of animation of each element. In this case, we’ll be animating the elements with the class name scrolled.
This is an example of a simple fade-in animation:
1 |
.js-scroll { |
2 |
opacity: 0; |
3 |
transition: opacity 500ms; |
4 |
}
|
5 |
|
6 |
.js-scroll.scrolled { |
7 |
opacity: 1; |
8 |
}
|
With this code, any js-scroll element on the page is hidden with an opacity of 0 until the class name scrolled is applied to it.
3. Targeting Elements With JavaScript
Once we have our layout and styles, we’re going to create the JavaScript functions to assign the class name to the elements when they scroll into view. We’re also going to fade out the elements in JavaScript instead of CSS, as we want the elements to be visible in the event a browser does not have JavaScript enabled.
We’ll break down the logic like this:
- Get all
js-scrollelements on the page - Fade out elements
- Detect when the element is within the viewport
- Assign the
scrolledclass name to the element if it is in view.
Target Elements on The Page
We’ll target all the js-scroll elements on the page using the document.querySelectorAll() method. It should look like this:
1 |
const scrollElements = document.querySelectorAll(".js-scroll"); |
Fade Out Elements
First, we need to remove the opacity:0 for .js-scroll in our CSS. Then we include this line in our JavaScript:
1 |
scrollElements.forEach((el) => {
|
2 |
el.style.opacity = 0 |
3 |
}) |
This allows the elements to have their default styling if JavaScript is disabled in the browser.
Detecting When an Element Is in View
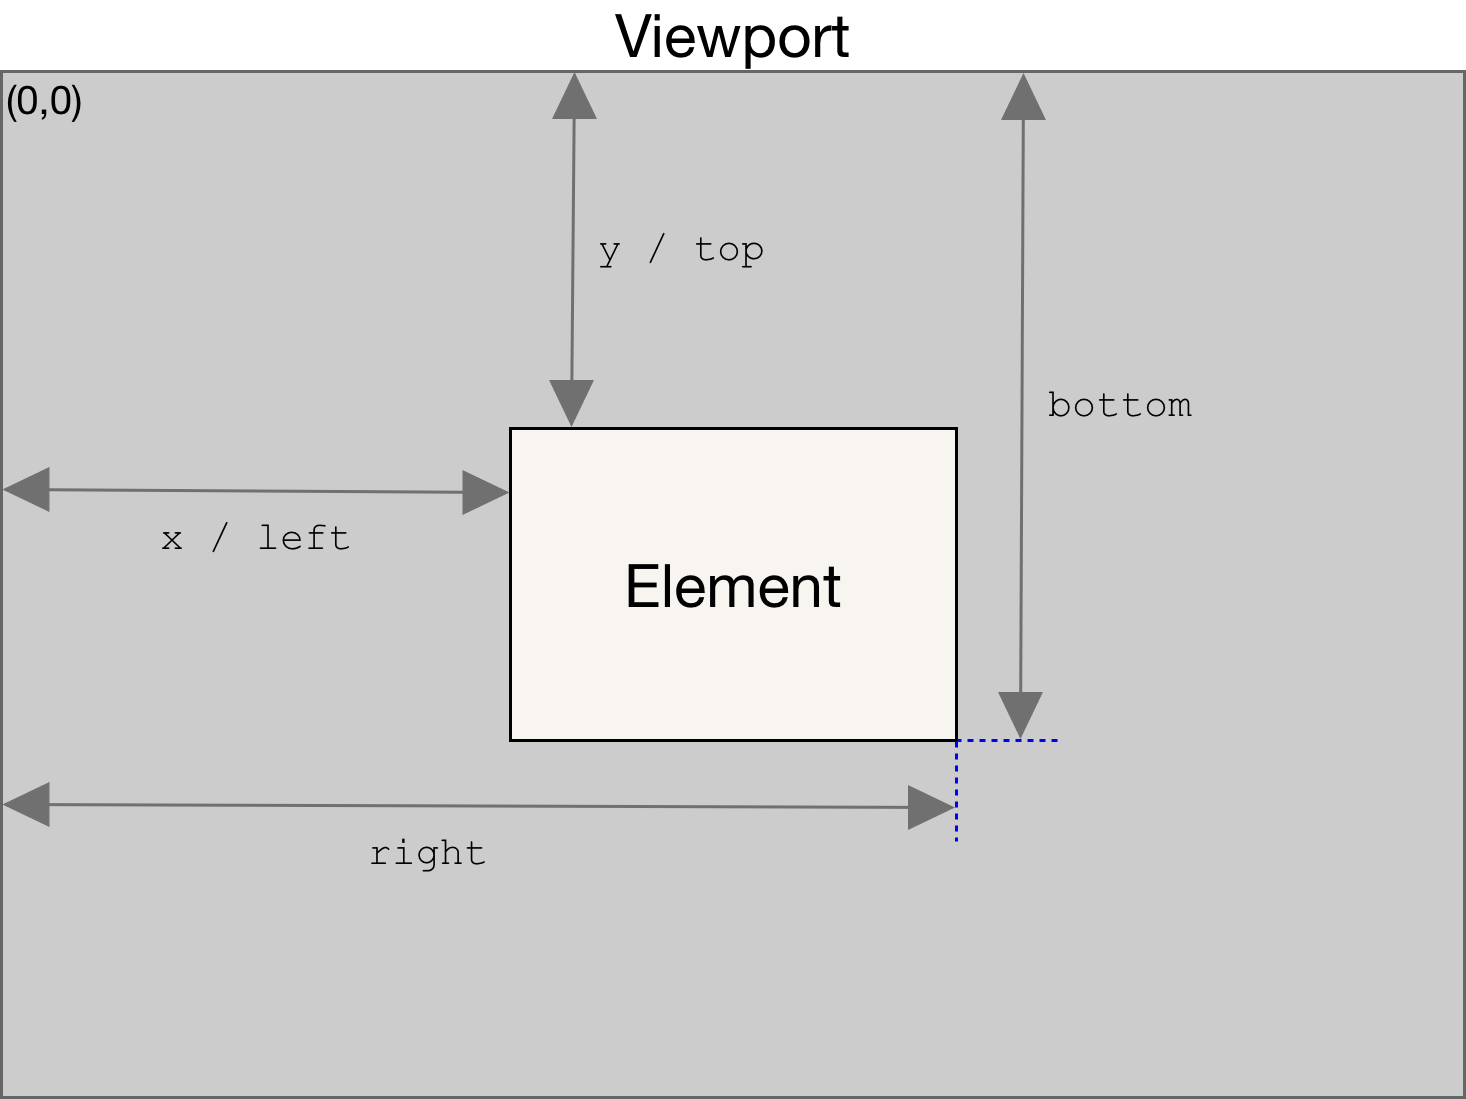
We can detect when an element is in view of the user by determining if the distance of the element from the top of the page is less than the height of the visible part of the page.
In JavaScript, we use the getBoundingClientRect().top method to get an element’s distance from the top of the page, and window.innerHeight or document.documentElement.clientHeight to get the height of the viewport.
We’ll create an elementInView function using the above logic:
1 |
const elementInView = (el) => { |
2 |
const elementTop = el.getBoundingClientRect().top; |
3 |
|
4 |
return ( |
5 |
elementTop <= (window.innerHeight || document.documentElement.clientHeight) |
6 |
);
|
7 |
};
|
We can modify this function to detect when the element has scrolled x pixels into the page, or detect when a percentage of the page has been scrolled.
1 |
const elementInView = (el, scrollOffset = 0) => { |
2 |
const elementTop = el.getBoundingClientRect().top; |
3 |
|
4 |
return ( |
5 |
elementTop <= |
6 |
((window.innerHeight || document.documentElement.clientHeight) - scrollOffset) |
7 |
);
|
8 |
};
|
In this case, the function returns true if the element has scrolled by the scrollOffset amount into the page. Modifying the logic gives us a different function for targeting elements based on percentage scroll.
1 |
const elementInView = (el, percentageScroll = 100) => { |
2 |
const elementTop = el.getBoundingClientRect().top; |
3 |
|
4 |
return ( |
5 |
elementTop <= |
6 |
((window.innerHeight || document.documentElement.clientHeight) * (percentageScroll/100)) |
7 |
);
|
8 |
};
|
An added benefit of a custom implementation is that we can define the logic to suit our specific needs.
Assign Class Name to Element
Now that we’re able to detect if our element has scrolled into the page, we’ll need to define a function to handle displaying the element–in this case we’re displaying the element by assigning the scrolled class name.
1 |
const displayScrollElement = (element) => { |
2 |
element.classList.add("scrolled"); |
3 |
};
|
We’ll then combine our logic with the display function and use the forEach method to call the function on all js-scroll elements.
1 |
const handleScrollAnimation = () => { |
2 |
scrollElements.forEach((el) => { |
3 |
if (elementInView(el, 100)) { |
4 |
displayScrollElement(el); |
5 |
}
|
6 |
})
|
7 |
}
|
An optional feature is to reset the element to its default state when it’s no longer in view. We can do that by defining a hideScrollElement function and including it in an else statement to our above function:
1 |
const hideScrollElement = (element) => { |
2 |
element.classList.remove("scrolled"); |
3 |
};
|
4 |
|
5 |
const handleScrollAnimation = () => { |
6 |
scrollElements.forEach((el) => { |
7 |
if (elementInView(el, 100)) { |
8 |
displayScrollElement(el); |
9 |
} else { |
10 |
hideScrollElement(el); |
11 |
}
|
12 |
})
|
13 |
}
|
Finally, we’ll pass the above method into a scroll event listener on the window so it runs whenever the user scrolls.
1 |
window.addEventListener('scroll', () => { |
2 |
handleScrollAnimation(); |
3 |
})
|


And viola, we’ve implemented all the functions we need to animate on scroll.
We can see how the logic works in this demo:
The complete code looks like this. JavaScript:
1 |
const scrollOffset = 100; |
2 |
|
3 |
const scrollElement = document.querySelector(".js-scroll"); |
4 |
|
5 |
const elementInView = (el, offset = 0) => { |
6 |
const elementTop = el.getBoundingClientRect().top; |
7 |
|
8 |
return ( |
9 |
elementTop <= |
10 |
((window.innerHeight || document.documentElement.clientHeight) - offset) |
11 |
);
|
12 |
};
|
13 |
|
14 |
const displayScrollElement = () => { |
15 |
scrollElement.classList.add('scrolled'); |
16 |
}
|
17 |
|
18 |
const hideScrollElement = () => { |
19 |
scrollElement.classList.remove('scrolled'); |
20 |
}
|
21 |
|
22 |
const handleScrollAnimation = () => { |
23 |
if (elementInView(scrollElement, scrollOffset)) { |
24 |
displayScrollElement(); |
25 |
} else { |
26 |
hideScrollElement(); |
27 |
}
|
28 |
}
|
29 |
|
30 |
window.addEventListener('scroll', () => { |
31 |
handleScrollAnimation(); |
32 |
})
|
CSS:
1 |
.js-scroll { |
2 |
width: 50%; |
3 |
height: 300px; |
4 |
background-color: #DADADA; |
5 |
transition: background-color 500ms; |
6 |
}
|
7 |
|
8 |
.js-scroll.scrolled { |
9 |
background-color: aquamarine; |
10 |
}
|
4. More Animations With CSS
Let’s take a look at the first demo again:
We see that the elements appear with different animations. This was done by assigning different CSS animations to class names. The HTML for this demo looks like this:
1 |
<section class="scroll-container"> |
2 |
<div class="scroll-element js-scroll fade-in"> |
3 |
</div>
|
4 |
<div class="scroll-caption"> |
5 |
This animation fades in. |
6 |
</div>
|
7 |
</section>
|
8 |
<section class="scroll-container"> |
9 |
<div class="scroll-element js-scroll fade-in-bottom"> |
10 |
</div>
|
11 |
<div class="scroll-caption"> |
12 |
This animation slides in to the top. |
13 |
</div>
|
14 |
</section>
|
15 |
<section class="scroll-container"> |
16 |
<div class="scroll-element js-scroll slide-left"> |
17 |
</div>
|
18 |
<div class="scroll-caption"> |
19 |
This animation slides in from the left. |
20 |
</div>
|
21 |
</section>
|
22 |
<section class="scroll-container"> |
23 |
<div class="scroll-element js-scroll slide-right"> |
24 |
</div>
|
25 |
<div class="scroll-caption"> |
26 |
This animation slides in from the right. |
27 |
</div>
|
28 |
</section>
|
1 |
.scrolled.fade-in { |
2 |
animation: fade-in 1s ease-in-out both; |
3 |
}
|
4 |
|
5 |
.scrolled.fade-in-bottom { |
6 |
animation: fade-in-bottom 1s ease-in-out both; |
7 |
}
|
8 |
|
9 |
.scrolled.slide-left { |
10 |
animation: slide-in-left 1s ease-in-out both; |
11 |
}
|
12 |
|
13 |
.scrolled.slide-right { |
14 |
animation: slide-in-right 1s ease-in-out both; |
15 |
}
|
16 |
|
17 |
@keyframes slide-in-left { |
18 |
0% { |
19 |
transform: translateX(-100px); |
20 |
opacity: 0; |
21 |
}
|
22 |
100% { |
23 |
transform: translateX(0); |
24 |
opacity: 1; |
25 |
}
|
26 |
}
|
27 |
|
28 |
@keyframes slide-in-right { |
29 |
0% { |
30 |
transform: translateX(100px); |
31 |
opacity: 0; |
32 |
}
|
33 |
100% { |
34 |
transform: translateX(0); |
35 |
opacity: 1; |
36 |
}
|
37 |
}
|
38 |
|
39 |
@keyframes fade-in-bottom { |
40 |
0% { |
41 |
transform: translateY(50px); |
42 |
opacity: 0; |
43 |
}
|
44 |
100% { |
45 |
transform: translateY(0); |
46 |
opacity: 1; |
47 |
}
|
48 |
}
|
49 |
|
50 |
@keyframes fade-in { |
51 |
0% { |
52 |
opacity: 0; |
53 |
}
|
54 |
100% { |
55 |
opacity: 1; |
56 |
}
|
57 |
}
|
We don’t need to make any changes to the JavaScript code since the logic remains the same. This means we can have any number of different animations on a page without writing new functions.
5. Increasing Performance with Throttle
Whenever we include a function in a scroll listener, that function is called every time the user scrolls the page. Scrolling a page of 500px can cause a function to be called at least 50 times. If we’re trying to include a lot of elements on the page, this can cause our page to slow down significantly.
Throttle Function to the Rescue!
We can reduce the number of times a function is called by using a “throttle function”. A throttle function is a higher order function that calls the function passed into it only once during a specified time interval.
It’s especially useful with scrolling events as we don’t need to detect every pixel scrolled by the user. For example, if we have a throttle function with a timer of 100ms, the function will only be called once for every 100ms the user scrolls.
A throttle function can be implemented in JavaScript like this:
1 |
//initialize throttleTimer as false
|
2 |
let throttleTimer = false; |
3 |
|
4 |
const throttle = (callback, time) => { |
5 |
//don't run the function while throttle timer is true
|
6 |
if (throttleTimer) return; |
7 |
|
8 |
//first set throttle timer to true so the function doesn't run
|
9 |
throttleTimer = true; |
10 |
|
11 |
setTimeout(() => { |
12 |
//call the callback function in the setTimeout and set the throttle timer to false after the indicated time has passed
|
13 |
callback(); |
14 |
throttleTimer = false; |
15 |
}, time); |
16 |
}
|
We can modify our window on scroll event listener to look like this
1 |
window.addEventListener('scroll', () => {
|
2 |
throttle(handleScrollAnimation, 250); |
3 |
}) |
Now our handleScrollAnimation function is called every 250ms while the user is scrolling.
Here’s what the updated demo looks like:
6. Improving Accessibility
Performance isn’t the only requirement when implementing a custom feature; we also need to design for accessibility. Designing for accessibility means taking users’ choices and circumstances into consideration. Some users may not want to have animations at all, so we need to account for that.
The Reduced Motion Media Query
We can do that with the prefers-reduced-motion query and a JavaScript implementation.
“prefers-reduced-motion [...] is used to detect if the user has requested that the system minimize the amount of non-essential motion it uses” – MDN
Modifying our code above, the query would look like this in CSS:
1 |
@media (prefers-reduced-motion) { |
2 |
.js-scroll { |
3 |
opacity: 1; |
4 |
}
|
5 |
.scrolled { |
6 |
animation: none !important; |
7 |
}
|
8 |
}
|
With these lines of code, we ensure that the animated elements are always visible and the animation is turned off for all elements.
The prefers-reduced-motion query isn’t fully supported across all browsers so we can include a JavaScript fallback:
1 |
const mediaQuery = window.matchMedia("(prefers-reduced-motion: reduce)"); |
2 |
|
3 |
window.addEventListener("scroll", () => { |
4 |
//check if mediaQuery exists and if the value for mediaQuery does not match 'reduce', return the scrollAnimation.
|
5 |
if (mediaQuery && !mediaQuery.matches) { |
6 |
handleScrollAnimation() |
7 |
}
|
8 |
});
|
This way, if the user prefers reduced motion, the handleScrollAnimation function is never called at all.
That’s How to Animate on Scroll with JavaScript
We now have a highly performant, fully accessible implementation of the “animate on scroll” feature that works across all browsers!
More Practical JavaScript Tutorials


