
JavaScript in the browser has evolved. Developers who want to take advantage of the latest features have the option of going framework-less with less hassle. Options normally reserved to front-end frameworks, such as a component-based approach, is now feasible in plain old JavaScript.
In this take, I’ll showcase all the latest JavaScript features, using a UI that features author data with a grid and a search filter. To keep it simple, once a technique gets introduced, I’ll move on to the next technique so as not to belabor the point. For this reason, the UI will have an Add option, and a dropdown search filter. The author model will have three fields: name, email, and an optional topic. Form validation will be included mostly to show this framework-less technique without being thorough.
The once plucky language has grown up with many modern features such as Proxies, import/export, the optional chain operator, and web components. This fits perfectly within the Jamstack, because the app renders on the client via HTML and vanilla JavaScript.
I’ll leave out the API to stay focused on the app, but I’ll point to where this integration can occur within the app.
Getting Started
The app is a typical JavaScript app with two dependencies: an http-server and Bootstrap. The code will only run in the browser, so there’s no back end other than one to host static assets. The code is up on GitHub for you to play with.
Assuming you have the latest Node LTS installed on the machine:
mkdir framework-less-web-components
cd framework-less-web-components
npm init
This should end up with a single package.json file where to put dependencies.
To install the two dependencies:
npm i http-server bootstrap@next --save-exact
- http-server: an HTTP server to host static assets in the Jamstack
- Bootstrap: a sleek, powerful set of CSS styles to ease web development
If you feel http-server isn’t a dependency, but a requirement for this app to run, there’s the option to install it globally via npm i -g http-server. Either way, this dependency isn’t shipped to the client, but only serves static assets to the client.
Open the package.json file and set the entry point via "start": "http-server" under scripts. Go ahead and fire up the app via npm start, which will make http://localhost:8080/ available to the browser. Any index.html file put in the root folder gets automatically hosted by the HTTP server. All you do is a refresh on the page to get the latest bits.
The folder structure looks like this:
┳
┣━┓ components
┃ ┣━━ App.js
┃ ┣━━ AuthorForm.js
┃ ┣━━ AuthorGrid.js
┃ ┗━━ ObservableElement.js
┣━┓ model
┃ ┣━━ actions.js
┃ ┗━━ observable.js
┣━━ index.html
┣━━ index.js
┗━━ package.json
This is what each folder is meant for:
components: HTML web components with anApp.jsand custom elements that inherit fromObservableElement.jsmodel: app state and mutations that listen for UI state changesindex.html: main static asset file that can be hosted anywhere
To create the folders and files in each folder, run the following:
mkdir components model
touch components/App.js components/AuthorForm.js components/AuthorGrid.js components/ObservableElement.js model/actions.js model/observable.js index.html index.js
Integrate Web Components
In a nutshell, web components are custom HTML elements. They define the custom element that can be put in the markup, and declare a callback method that renders the component.
Here’s a quick rundown of a custom web component:
class HelloWorldComponent extends HTMLElement {
  connectedCallback() { // callback method
    this.innerHTML = 'Hello, World!'
  }
}

// Define the custom element
window.customElements.define('hello-world', HelloWorldComponent)

// The markup can use this custom web component via:
// <hello-world></hello-world>
If you feel you need a more gentle introduction to web components, check out the MDN article. At first, they may feel magical, but a good grasp of the callback method makes this perfectly clear.
The main index.html static page declares the HTML web components. I’ll use Bootstrap to style HTML elements and bring in the index.js asset that becomes the app’s main entry point and gateway into JavaScript.
Bust open the index.html file and put this in place:
<!doctype html>
<html lang="en">
<head>
  <meta charset="utf-8">
  <meta name="viewport" content="width=device-width, initial-scale=1">
  <link href="node_modules/bootstrap/dist/css/bootstrap.min.css" rel="stylesheet">
  <title>Framework-less Components</title>
</head>
<body>
<template id="html-app">
  <div class="container">
    <h1>Authors</h1>
    <author-form></author-form>
    <author-grid></author-grid>
    <footer class="fixed-bottom small">
      <p class="text-center mb-0">
        Hit Enter to add an author entry
      </p>
      <p class="text-center small">
        Created with ❤ By C R
      </p>
    </footer>
  </div>
</template>
<template id="author-form">
  <form>
    <div class="row mt-4">
      <div class="col">
        <input type="text" class="form-control" placeholder="Name" aria-label="Name">
      </div>
      <div class="col">
        <input type="email" class="form-control" placeholder="Email" aria-label="Email">
      </div>
      <div class="col">
        <select class="form-select" aria-label="Topic">
          <option>Topic</option>
          <option>JavaScript</option>
          <option>HTMLElement</option>
          <option>ES7+</option>
        </select>
      </div>
      <div class="col">
        <select class="form-select search" aria-label="Search">
          <option>Search by</option>
          <option>All</option>
          <option>JavaScript</option>
          <option>HTMLElement</option>
          <option>ES7+</option>
        </select>
      </div>
    </div>
  </form>
</template>
<template id="author-grid">
  <table class="table mt-4">
    <thead>
      <tr>
        <th>Name</th>
        <th>Email</th>
        <th>Topic</th>
      </tr>
    </thead>
    <tbody>
    </tbody>
  </table>
</template>
<template id="author-row">
  <tr>
    <td></td>
    <td></td>
    <td></td>
  </tr>
</template>
<nav class="navbar navbar-expand-lg navbar-light bg-dark">
  <div class="container-fluid">
    <a class="navbar-brand text-light" href="/">
      Framework-less Components with Observables
    </a>
  </div>
</nav>
<html-app></html-app>
<script type="module" src="index.js"></script>
</body>
</html>
Pay close attention to the script tag with a type attribute set to module. This is what unlocks import/export in vanilla JavaScript in the browser. The template tag with an id defines the HTML elements that enable web components. I’ve broken up the app into three main components: html-app, author-form, and author-grid. Because nothing’s defined in JavaScript yet, the app will render the navigation bar without any of the custom HTML tags.
To start off easy, place this in ObservableElement.js. It’s the parent element to all the author components:
export default class ObservableElement extends HTMLElement {
}
Then, define the html-app component in App.js:
export default class App extends HTMLElement {
  connectedCallback() {
    this.template = document
      .getElementById('html-app')

    window.requestAnimationFrame(() => {
      const content = this.template
        .content
        .firstElementChild
        .cloneNode(true)

      this.appendChild(content)
    })
  }
}
Note the use of export default to declare JavaScript classes. This is the capability I enabled via the module type when I referenced the main script file. To use web components, inherit from HTMLElement and define the connectedCallback class method. The browser takes care of the rest. I’m using requestAnimationFrame to render the main template before the next repaint in the browser.
This is a common technique you’ll see with web components. First, grab the template via an element ID. Then, clone the template via cloneNode. Lastly, appendChild the new content into the DOM. If you run into any problems where web components don’t render, be sure to check that the cloned content got appended to the DOM first.
Next, define the AuthorGrid.js web component. This one will follow a similar pattern and manipulate the DOM a bit:
import ObservableElement from './ObservableElement.js'

export default class AuthorGrid extends ObservableElement {
  connectedCallback() {
    this.template = document
      .getElementById('author-grid')
    this.rowTemplate = document
      .getElementById('author-row')
    const content = this.template
      .content
      .firstElementChild
      .cloneNode(true)
    this.appendChild(content)

    this.table = this.querySelector('table')
    this.updateContent()
  }

  updateContent() {
    this.table.style.display =
      (this.authors?.length ?? 0) === 0
        ? 'none'
        : ''

    this.table
      .querySelectorAll('tbody tr')
      .forEach(r => r.remove())
  }
}
I defined the main this.table element with a querySelector. Because this is a class, it’s possible to keep a nice reference to the target element by using this. The updateContent method mostly nukes the main table when there are no authors to show in the grid. The optional chaining operator (?.) and null coalescing takes care of setting the display style to none.
Take a look at the import statement, because it brings in the dependency with a fully qualified extension in the file name. If you’re used to Node development, this is where it differs from the browser implementation, which follows the standard, where this does require a file extension like .js. Learn from me and be sure to put the file extension while working in the browser.
Next, the AuthorForm.js component has two main parts: render the HTML and wire up element events to the form.
To render the form, open AuthorForm.js:
import ObservableElement from './ObservableElement.js'

export default class AuthorForm extends ObservableElement {
  connectedCallback() {
    this.template = document
      .getElementById('author-form')
    const content = this.template
      .content
      .firstElementChild
      .cloneNode(true)

    this.appendChild(content)

    this.form = this.querySelector('form')
    this.form.querySelector('input').focus()
  }

  resetForm(inputs) {
    inputs.forEach(i => {
      i.value = ''
      i.classList.remove('is-valid')
    })
    inputs[0].focus()
  }
}
The focus guides the user to start typing on the first input element available in the form. Be sure to place any DOM selectors after the appendChild, as otherwise this technique won’t work. The resetForm isn’t used right now but will reset the state of the form when the user presses Enter.
Wire up events via addEventListener by appending this code inside the connectedCallback method. This can be added to the very end of the connectedCallback method:
this.form
  .addEventListener('keypress', e => {
    if (e.key === 'Enter') {
      const inputs = this.form.querySelectorAll('input')
      const select = this.form.querySelector('select')

      console.log('Pressed Enter: ' +
        inputs[0].value + '|' +
        inputs[1].value + '|' +
        (select.value === 'Topic' ? '' : select.value))

      this.resetForm(inputs)
    }
  })

this.form
  .addEventListener('change', e => {
    if (e.target.matches('select.search')
      && e.target.value !== 'Search by') {
      console.log('Filter by: ' + e.target.value)
    }
  })
These are typical event listeners that get attached to the this.form element in the DOM. The change event uses event delegation to listen for all change events in the form but targets only the select.search element. This is an effective way to delegate a single event to as many target elements in the parent element. With this in place, typing anything in the form and hitting Enter resets the form back to zero state.
To get these web components to render on the client, open index.js and put this in:
import AuthorForm from './components/AuthorForm.js'
import AuthorGrid from './components/AuthorGrid.js'
import App from './components/App.js'

window.customElements.define('author-form', AuthorForm)
window.customElements.define('author-grid', AuthorGrid)
window.customElements.define('html-app', App)
Feel free to refresh the page in the browser now and play with the UI. Open up your developer tools and look at the console messages as you click and type in the form. Pressing the Tab key should help you navigate between input elements in the HTML document.
Validate the Form
From playing around with the form you may notice it takes in arbitrary input when both the name and email are required, and the topic is optional. The framework-less approach can be a combination of HTML validation and a bit of JavaScript. Luckily, Bootstrap makes this somewhat easy by adding/removing CSS class names via the classList web API.
Inside the AuthorForm.js component, find the console.log in the Enter key event handler, look for the log with “Pressed Enter”, and put this in right above it:
if (!this.isValid(inputs)) return
Then, define the isValid class method in AuthorForm. This may go above the resetForm method:
isValid(inputs) {
  let isInvalid = false

  inputs.forEach(i => {
    if (i.value && i.checkValidity()) {
      i.classList.remove('is-invalid')
      i.classList.add('is-valid')
    } else {
      i.classList.remove('is-valid')
      i.classList.add('is-invalid')
      isInvalid = true
    }
  })

  return !isInvalid
}
In vanilla JavaScript, calling checkValidity uses the built-in HTML validator, because I tagged an input element with type="email". To check for required fields, a basic truthy check does the trick via i.value. The classList web API adds or removes CSS class names, so the Bootstrap styling can do its job.
Now, go ahead and give the app another try. Attempting to enter invalid data now gets flagged, and valid data now resets the form.
Observables
Time for the meat (or potatoes for my veggie friends) of this approach, because web components, and event handlers, can only take me so far. To make this app state-driven, I’ll need a way to track changes to the UI state. It turns out that observables are perfect for this, because they can fire updates to the UI when the state mutates. Think of observables as a sub/pub model, where subscribers listen for changes, and the publisher fires which changes took place in the UI state. This streamlines the amount of push and pull code necessary to build complex and exciting UIs without any framework.
Open the obserable.js file under model and put this in:
const cloneDeep = x => JSON.parse(JSON.stringify(x))
const freeze = state => Object.freeze(cloneDeep(state))

export default initialState => {
  let listeners = []

  const proxy = new Proxy(cloneDeep(initialState), {
    set: (target, name, value) => {
      target[name] = value
      listeners.forEach(l => l(freeze(proxy)))
      return true
    }
  })

  proxy.addChangeListener = cb => {
    listeners.push(cb)
    cb(freeze(proxy))
    return () =>
      listeners = listeners.filter(el => el !== cb)
  }

  return proxy
}
This may look scary at first, but it’s doing two things: hijacking the setter to catch mutations, and adding listeners. In ES6+, the Proxy class enables a proxy that wraps around the initialState object. This can intercept basic operations like this set method, which executes when there are changes to the object. Returning true in the setter lets the internal machinery in JavaScript know the mutation succeeded. The Proxy sets up a handler object where traps such as set get defined. Because I only care for mutations to the state object, the set has a trap. All other pieces of functionality, such as reads, get forwarded directly to the original state object.
Listeners keep a list of subscribed callbacks that want to be notified of mutations. The callback gets executed once after the listener get added, and it returns the listening callback for future reference.
The freeze and cloneDeep functions are put in place to prevent any further mutations of the underlying state object. This keeps the UI state more predictable and somewhat stateless because the data only moves in one direction.
Now, go to the actions.js file and put this in place:
export default state => {
  const addAuthor = author => {
    if (!author) return

    state.authors = [...state.authors, {
      ...author
    }]
  }

  const changeFilter = currentFilter => {
    state.currentFilter = currentFilter
  }

  return {
    addAuthor,
    changeFilter
  }
}
This is a testable JavaScript object that performs actual mutations to the state. For the sake of brevity, I’ll forgo writing unit tests but will leave this as an exercise for readers.
To fire mutations from the web components, they’ll need to be registered on the global window.applicationContext object. This makes this state object with mutations available to the rest of the app.
Open the main index.js file and add this right above where I registered the custom elements:
import observableFactory from './model/observable.js'
import actionsFactory from './model/actions.js'

const INITIAL_STATE = {
  authors: [],
  currentFilter: 'All'
}

const observableState = observableFactory(INITIAL_STATE)
const actions = actionsFactory(observableState)

window.applicationContext = Object.freeze({
  observableState,
  actions
})
There are two objects available: the proxy observableState and the actions with mutations. The INITIAL_STATE bootstraps the app with initial data. This is what sets the initial zero config state. The action mutations take in the observable state and fire updates for all listeners by making changes to the observableState object.
Because mutations are not hooked up to the web components via applicationContext yet, the UI won’t track any changes. The web components will need HTML attributes to mutate and display state data. This is what comes next.
Observed Attributes
For web components, mutations to the state can be tracked via the attributes web API. These are getAttribute, setAttribute, and hasAttribute. With this arsenal, it’s more effective to persist UI state in the DOM.
Crack open ObservableElement.js and gut it out, replacing it with this code:
export default class ObservableElement extends HTMLElement {
  get authors() {
    if (!this.hasAttribute('authors')) return []

    return JSON.parse(this.getAttribute('authors'))
  }

  set authors(value) {
    if (this.constructor
      .observedAttributes
      .includes('authors')) {
      this.setAttribute('authors', JSON.stringify(value))
    }
  }

  get currentFilter() {
    if (!this.hasAttribute('current-filter')) return 'All'

    return this.getAttribute('current-filter')
  }

  set currentFilter(value) {
    if (this.constructor
      .observedAttributes
      .includes('current-filter')) {
      this.setAttribute('current-filter', value)
    }
  }

  connectAttributes () {
    window
      .applicationContext
      .observableState
      .addChangeListener(state => {
        this.authors = state.authors
        this.currentFilter = state.currentFilter
      })
  }

  attributeChangedCallback () {
    this.updateContent()
  }
}
I purposely used snake casing in the current-filter attribute. This is because the attribute web API only supports lower case names. The getter/setter does the mapping between this web API and what the class expects, which is camel case.
The connectAttributes method in the web component adds its own listener to track state mutations. There’s an attributeChangedCallback available that fires when the attribute changes, and the web component updates the attribute in the DOM. This callback also calls updateContent to tell the web component to update the UI. The ES6+ getter/setter declares the same properties found in the state object. This it what makes this.authors, for example, accessible to the web component.
Note the use of constructor.observedAttributes. This is a custom static field I can declare now, so the parent class ObservableElement can track which attributes the web component cares about. With this, I can pick and choose which part of the state model is relevant to the web component.
I’ll take this opportunity to flesh out the rest of the implementation to track and change state via observables in each web component. This is what makes the UI “come alive” when there are state changes.
Go back to AuthorForm.js and make these changes. Code comments will tell you where to put it (or you can consult the repo):
// This goes at top, right below the class declaration
static get observedAttributes() {
  return [
    'current-filter'
  ]
}

// In the Enter event handler, right above resetForm
this.addAuthor({
  name: inputs[0].value,
  email: inputs[1].value,
  topic: select.value === 'Topic' ? '' : select.value
})

// In the select event handler, rigth below console.log
this.changeFilter(e.target.value)

// At the very end of the connectedCallback method
super.connectAttributes()

// These helpers method go at the bottom of the class
addAuthor(author) {
  window
    .applicationContext
    .actions
    .addAuthor(author)
}

changeFilter(filter) {
  window
    .applicationContext
    .actions
    .changeFilter(filter)
}

updateContent() {
  // Capture state mutation to synchronize the search filter
  // with the dropdown for a nice effect, and reset the form
  if (this.currentFilter !== 'All') {
    this.form.querySelector('select').value = this.currentFilter
  }
  this.resetForm(this.form.querySelectorAll('input'))
}
In the Jamstack, you may need to call a back-end API to persist the data. I recommend using the helper methods for these types of calls. Once the persisted state comes back from an API, it can be mutated within the app.
Lastly, find the AuthorGrid.js and wire up the observable attributes (the final file is here):
// This goes at top, right below the class declaration
static get observedAttributes() {
  return [
    'authors',
    'current-filter'
  ]
}

// At the very end of the connectedCallback method
super.connectAttributes()

// This helper method can go right above updateContent
getAuthorRow(author) {
  const {
    name,
    email,
    topic
  } = author

  const element = this.rowTemplate
    .content
    .firstElementChild
    .cloneNode(true)
  const columns = element.querySelectorAll('td')

  columns[0].textContent = name
  columns[1].textContent = email
  columns[2].textContent = topic

  if (this.currentFilter !== 'All'
    && topic !== this.currentFilter) {
    element.style.display = 'none'
  }

  return element
}

// Inside updateContent, at the very end
this.authors
  .map(a => this.getAuthorRow(a))
  .forEach(e => this.table
    .querySelector('tbody')
    .appendChild(e))
Each web component can track different attributes, depending on what gets rendered in the UI. This is a nice clean way to separate components because it only deals with its own state data.
Go ahead and take this for a spin in the browser. Crack open the developer tools and inspect the HTML. You’ll see attributes set in the DOM, like current-filter, at the root of the web component. As you click and press Enter, note the app automatically tracks mutations to the state in the DOM.
Gotchas
For the pièce de résistance, be sure to leave the developer tools open, go to the JavaScript Debugger and find AuthorGrid.js. Then, set a breakpoint anywhere in updateContent. Select a search filter. Notice the browser hits this code more than once? This means code that updates the UI runs not once, but every time the state mutates.
This is because of this code that’s in ObservableElement:
window
  .applicationContext
  .observableState
  .addChangeListener(state => {
    this.authors = state.authors
    this.currentFilter = state.currentFilter
  })
Currently, there are exactly two listeners that fire when there are changes to the state. If the web component tracks more than one state property, like this.authors, this fires that many more updates to the UI. This causes the UI to update inefficiently and may cause a lag with enough listeners and changes to the DOM.
To remedy this, open up ObservableElement.js and home in on the HTML attribute setters:
// This can go outside the observable element class
const equalDeep = (x, y) => JSON.stringify(x) === JSON.stringify(y)

// Inside the authors setter
if (this.constructor.observedAttributes.includes('authors')
  && !equalDeep(this.authors, value)) {

// Inside the currentFilter setter
if (this.constructor.observedAttributes.includes('current-filter')
  && this.currentFilter !== value) {
This adds a layer of defensive programming to detect attribute changes. When the web component realizes it doesn’t need to update the UI, it skips setting the attribute.
Now go back to the browser with the breakpoint, updating state should hit updateContent only once.

Final demo
This is what the app will look like with observables and web components:
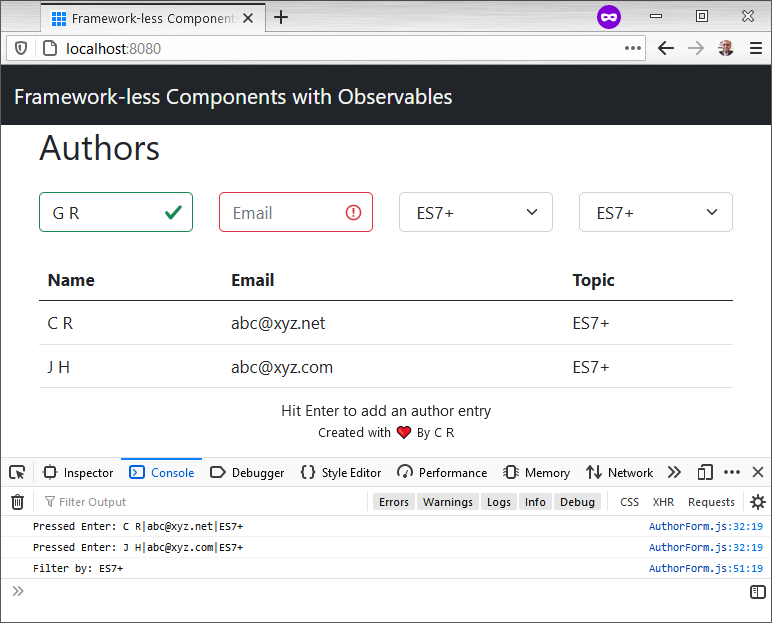
And don’t forget, you can find the complete code on GitHub.
Conclusion
Framework-less apps via web components and observables have a nice way of building feature-rich UIs without any dependencies. This keeps the app payload lightweight and snappy for customers.
Frequently Asked Questions (FAQs) about Building a Frameworkless Web App with Modern JavaScript Web Components
What are the benefits of building a web app without a framework?
Building a web app without a framework, also known as a frameworkless web app, offers several benefits. Firstly, it reduces the dependency on third-party libraries, making your code more efficient and easier to maintain. Secondly, it gives you more control over your code, allowing you to tailor it to your specific needs. Lastly, it helps you understand the underlying principles of web development better, as you’re not relying on a framework to do the heavy lifting.
How can I ensure my web app is compatible with different browsers?
Ensuring browser compatibility is crucial when building a web app. You can use tools like Babel to transpile your JavaScript code into a version that’s compatible with older browsers. Additionally, you can use polyfills to provide modern functionality on older browsers that do not natively support it.
How can I manage state in a frameworkless web app?
Managing state in a frameworkless web app can be challenging, but it’s not impossible. You can use the Observer pattern, which allows objects to observe and react to changes in other objects. Alternatively, you can use the Publish/Subscribe pattern, which allows objects to communicate with each other without being tightly coupled.
How can I handle routing in a frameworkless web app?
Handling routing in a frameworkless web app can be done using the History API, which allows you to manipulate the browser history. You can use the pushState method to add a new entry to the history stack, and the popstate event to handle when the user navigates through the history.
How can I test my frameworkless web app?
Testing a frameworkless web app can be done using unit tests and end-to-end tests. Unit tests allow you to test individual functions or components, while end-to-end tests allow you to test the entire application flow. Tools like Jest and Cypress can be used for these types of tests.
How can I optimize the performance of my frameworkless web app?
Optimizing the performance of a frameworkless web app can be done by minimizing the amount of JavaScript you use, using efficient algorithms, and optimizing your code for the JavaScript engine. Tools like Google Lighthouse can help you identify performance bottlenecks.
How can I handle errors in a frameworkless web app?
Handling errors in a frameworkless web app can be done using try/catch blocks, which allow you to catch and handle errors gracefully. Additionally, you can use the window.onerror event to catch unhandled errors.
How can I secure my frameworkless web app?
Securing a frameworkless web app involves several steps, including sanitizing user input to prevent XSS attacks, using HTTPS to encrypt data in transit, and using secure cookies to protect session information.
How can I make my frameworkless web app accessible?
Making a frameworkless web app accessible involves following the Web Content Accessibility Guidelines (WCAG), which provide recommendations for making web content more accessible to people with disabilities. This includes using semantic HTML, providing alternative text for images, and ensuring sufficient color contrast.
How can I deploy my frameworkless web app?
Deploying a frameworkless web app can be done using a variety of services, such as Netlify, Vercel, or GitHub Pages. These services provide a simple and efficient way to host your web app and make it accessible to the world.
 Camilo Reyes
Husband, father, and software engineer from Houston, Texas. Passionate about JavaScript and cyber-ing all the things.