
Intro
Over the past month or so I’ve come across a couple articles that talk about how web content creators should use a technique called “dithering” on their website’s images in order to send less data to their users and have their site load faster.
The first article was “Why Your Website Should Use Dithered Images” by Nathaniel. Nathaniel created a web tool called Dither Me This that allows users to upload images and choose different dithering modes to “reduce the file size of an image… but in a stylish old-school way.”
The website claims:
“Dithering was (still is) used to display pictures on old screens with limited colors. But has the modern advantage of making web pages load faster.”
The other article I came across (at a separate time, even though it’s linked to in Nathaniel’s blog post) was “How to Build a Low-tech Website?” It talks about Low Tech Magazine rebuilding their website with an environmental angle, and how they’ve decreased the amount of energy their website uses by sending less data to the user. The article says “we chose to apply an obsolete image compression technique called “dithering””, and claim “compared to the old website, the images are roughly ten times less resource-intensive.”
What is dithering?
Here’s a nice description from Wikipedia:
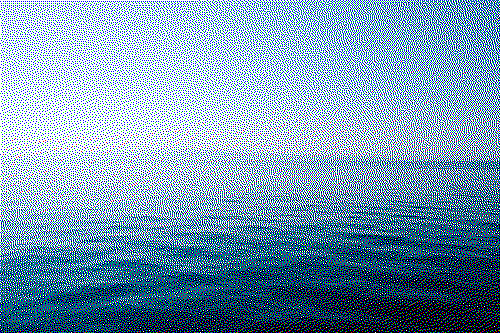
“Dithering is used in computer graphics to create the illusion of color depth in images on systems with a limited color palette. In a dithered image, colors that are not available in the palette are approximated by a diffusion of colored pixels from within the available palette. The human eye perceives the diffusion as a mixture of the colors within it. Dithered images, particularly those using palettes with relatively few colors, can often be distinguished by a characteristic graininess or speckled appearance.”
So where does the compression part come into this? If you reduce the color palette for the image then you can reduce the “color depth” or “bit depth” of an image. For example, if your only colors are black and white, then each pixel of the image only needs to be represented by a 1 (for white) or 0 (for black), and the dithering pattern can trick your eyes into seeing the grays in between.
Does dithering reduce your image’s file size?
So let’s do some tests and see if dithering an image actually reduces file size, and whether it’s the best solution for the job. If we can get our image file sizes smaller, our website will get faster, and we’ll use less energy to transfer bits across the web.
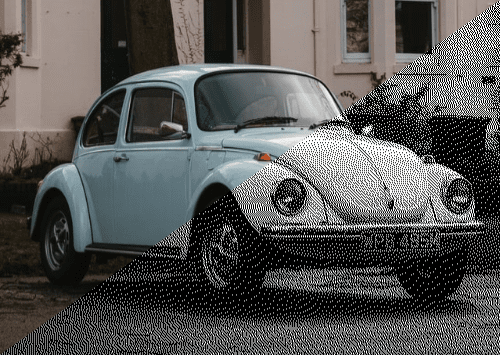
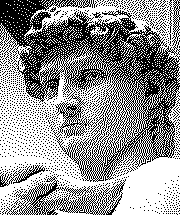
This isn’t a completely scientific process, so we’ll just use four images: black and white complex, black and white simple, colored complex, and colored simple. These images are arbitrarily chosen off of Unsplash just as someone might do when they’re picking an image for their own blog. We’ve got four images we’ll call B&W Complex, B&W Simple, Color Complex, and Color Simple.
These images are very large. Way larger than you should be using in production. But it shouldn’t really matter how big the image is, right? If dithering reduces file size, then we should see that.
|
B&W Complex |
B&W Simple |
Color Complex |
Color Simple |
|
|
Original JPG |
1.53 MB |
3.50 MB |
1.69 MB |
552 KB |
|
Dithered JPG |
16.1 MB |
16.4 MB |
24.7 MB |
29.9 MB |
|
Dithered PNG |
2.73 MB |
2.27 MB |
4.63 MB |
4.25 MB |
|
Original WebP |
384 KB |
1.74 MB |
660 KB |
240 KB |
|
Original AVIF |
126 KB |
982 KB |
358 KB |
85.5 KB |
Here’s the process for how I got these results:
- Dithered JPG and Dithered PNG are the result of using Nathaniel’s Dither Me This. I uploaded the Original JPG image, and for the black and white photos I used the “Black and White Dither” preset, for the color photos I used the “RGB Dither” preset. I also set the output width to match the dimensions of the Original JPG image.
- For the WebP images I used Squoosh set to the default quality of “75”.
- For the AVIF images I used Squoosh set to the default quality of “30”.
Similar to what was said in Nathaniel’s article, JPGs are not going to do well with dithered images, and we can see that they do absolutely horribly. But, according to the other claims made by the article, we should have seen decreases in file sizes for the Dithered PNGs for all the images…and we only see that one image achieved that.
We can also see that converting the original non-dithered image to WebP gets a much smaller file size, and the original aesthetic of the image is preserved. Just for fun I also added AVIF, one of the newer formats that can only be used in Firefox and Chrome right now, and you can see that the file size is absolutely tiny for the size of the image.
Does resizing get better results?
Now, one of the things that happens when using Nathaniel’s dithering tool (and is mentioned in his article), is image resizing. He doesn’t explicitly mention this as a requirement to get good results, but perhaps dithering works better on smaller images. So here’s the Color Simple image (which had the worst results when converting from the Original JPG to the Dithered PNG) resized to a width of 500 pixels:
|
Resized Color Simple |
|
|
Original JPG |
133 KB |
|
Dithered JPG |
354 KB |
|
Dithered PNG |
53.4 KB |
|
Original WebP |
6.31 KB |
|
Original AVIF |
3.12 KB |
By shrinking the image, we were actually able to get a reduction in file size when going from the Original JPG to the Dithered PNG! But…as you can see it’s still nowhere close to the file size we get by just converting the Original JPG to WebP.
But, the original article mentions we can get an even smaller file size from the Dithered PNG by converting it to a Lossless WebP (a WebP that compresses more like a PNG than a JPEG).
|
Resized Color Simple |
|
|
Dithered PNG |
53.4 KB |
|
Dithered WebP |
30.1 KB |
And these results confirm that! We were able to shrink it by 43%, down to 30.1 KB. But is that smaller than the WebP we created from the original image?
|
Resized Color Simple |
|
|
Original WebP |
6.31 KB |
|
Dithered WebP |
30.1 KB |
Not even close. The Dithered WebP is 377% bigger than the Original WebP.
Final Comparisons
Original JPG (133 KB)
Dithered Lossless WebP (30.1 KB)
Original WebP (6.31 KB)
Conclusion
Unless you’re going for an aesthetic look, converting your images to dithered versions for your blog posts is not a great idea. Not only do you have to resize them to be much smaller if you actually want to see any difference in file size while dithering, the dithering doesn’t get you anywhere close to the amount of savings you’d get by just converting the original image to WebP.
Loved the article? Hated it? Didn’t even read it?
We’d love to hear from you.


The whole point of dithering is that you can use a lower color depth while being perceptually similar to the original. The article doesn’t seem to mention the dithering process, but if it doesn’t include color depth reduction, then you’re just introducing less-compressible noise for no reason.
Hi, Charlie Hayes. Thanks for the dithering insight!
Curious why GIF was left out – it’d win in file sizes over all those other formats.
Indexed PNG and Webp frequently win out for me vs gif for the same image. Gif in these examples would probably win, because it would default to an indexed color palette, where the pngs and webp are probably using true color, based on the filesizes, and not being indexed the way they should.
GIF only supports a maximum of 256 colors (8bit) so it more-or-less forces dithering. PNG also supports indexed color (8bit) which drastically reduces file size compared to 24bit or 32bit PNG. PNG compresses better than GIF, though PNG has a larger header. So for smaller images, GIF is better, and for larger images PNG (8bit) would be better.
Article ignores the history of why image compression techniques and limited palletes existed in the first place.
Early in PC (and PC game) history developers were forced to come up with clever tricks to take advantage of limited hardware because the hardware and memory were expensive and limited. So developers often came up with their own file formats and techniques to cut out unnecessary data for games and applications so they could run at a decent framerate. AKA drawing pixels to the screen and updating them were expensive in terms of hardware.
In the 90’s right before the launch of 3D accelerators in 1996 starting with voodoo 1. The videocards made for PC’s were not good at keeping good framerates in games and applications. 3Dfx overnight changed the videocard market for PC’s very quickly ATI, Nvidia and 3dfx became the only cards you could possibly use in your PC while other vendors were obliterated from the market because games were the PC’s killer app for video cards.
When people talk about dithering, they really are talking about using less information and color/bit depth to reduce file sizes. That takes some knowledge and history of computing to talk about it with any kind of intelligence.
Most new people today are totally divorced from how hardware was like pre 1996. The reasons so many things were as they were, were because we were dealing with hardware limitations.
I came to more-or-less the same conclusions back in August at https://opguides.info/posts/lowbandwidthimages/ but I’m glad to see others verifying that work and presenting it to a larger audience.