Delivering 3D Scenes to the Web
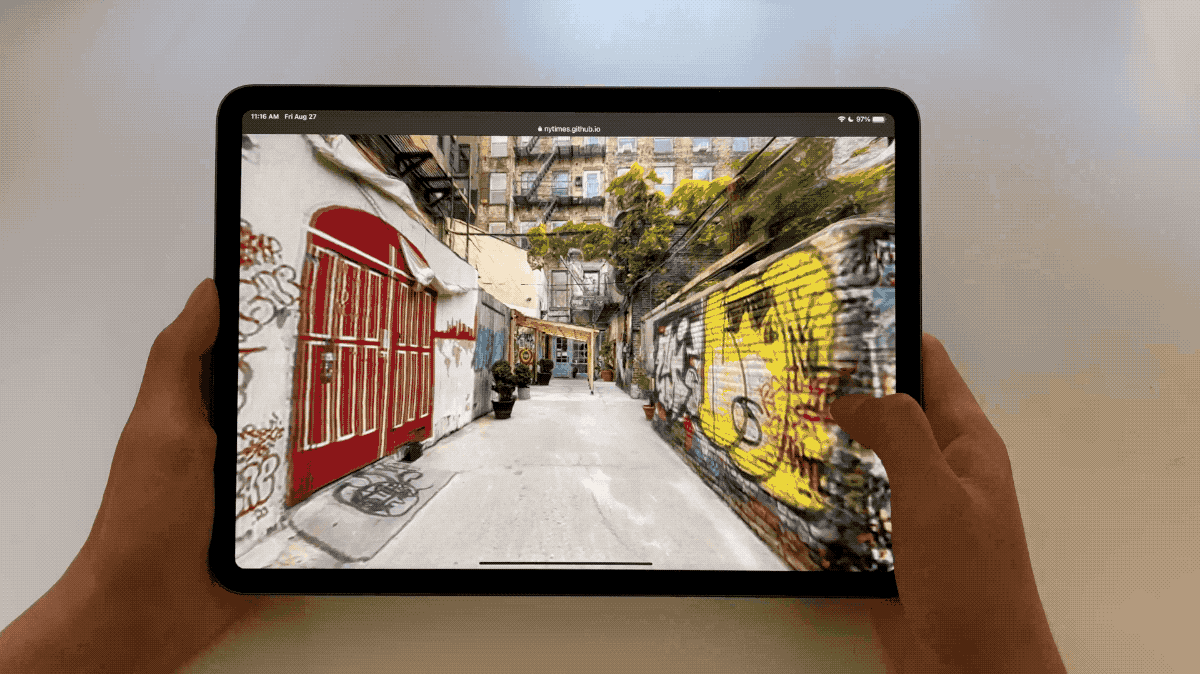
Scrolling through the model of Freeman Alley on the web using our open-source 3D Tiles loader.
There are a number of different methods for loading a 3D model on a website. Choosing the best one for your project depends on a few things, including the amount of interaction, control and scene customization needed, as well as the size of your model.
Below, we’ll share four demos that showcase the methods that we’ve found most useful for publishing photogrammetry to the web. Note that the demos will increase in complexity throughout the guide, with the first offering the simplest approach of using Google’s Model Viewer to load a 3D scene as an HTML element. The next demo uses Sketchfab, which makes it fairly easy to upload and publish 3D models with a bit of customization. The third demo (which we cover in more detail than the others because it is more complex, and because it forms the basis for the fourth demo) uses Three.js, a javascript library for working in 3D, along with one of our open-source control schemes. The final demo uses our open-source 3D Tiles-loading library to load the model in a Three.js scene.
What this guide covers: Four options for how to publish 3D models within web-based journalistic articles, including a demo for each option.
What you’ll need:
- Familiarity with HTML and CSS
- Familiarity with Javascript for demos 2, 3 and 4
- For demos 3 and 4, familiarity with Three.js will be helpful
- Familiarity with the command line will be helpful (but is not required)
- A code editor
- Web hosting
A NOTE ON MODEL SIZE
The “size” of the model refers to the triangle count, number of textures and texture resolution. In our testing, we’ve found that iPhones perform best with 2K textures, Android phones can support up to 4K textures and desktop browsers can support up to 8K textures.
For a single mesh, we don’t advise using more than six textures, and recommend using a triangle count between 1-2 million. For larger, more detailed models, this is a major limitation, as a model size of six 2K textures, for example, would not render the environment with enough clarity to read text within the scene. To get past this limitation, you can convert the model to 3D Tiles, a format developed by Cesium that breaks the model into smaller chunks of different resolutions. When loaded into the browser, the highest resolution chunks are only shown when they are within a certain viewing distance of the camera, thereby reducing the amount of geometry and texture loaded at any given moment.
Demo 1: Google’s Model Viewer
Our first demo simply uses Google’s Model Viewer, also referred to as <model-viewer>, to display the 3D model. It is a free-to-use library that lets you load a 3D model similar to how you’d load an image in HTML. It ensures the model is always well-framed across different screen sizes, and allows for customization through code.
To use Model Viewer, the model must first be converted into a glTF/GLB format, which can be done with a variety of tools such as the Three.js editor, Blender or Maya (with a plugin), or command-line tools like Facebook’s FBX2glTF. Model Viewer also allows you to view the model in physical space through an augmented reality mode. To find out more about how we use Model Viewer, explore our code here, or refer to Google’s documentation.


Demo 1 uses Google's Model Viewer to display the photogrammetry model.
Demo 2: Sketchfab
Sketchfab is a web platform that makes it easy to upload and publish 3D models. The free plan allows uploads up to 100MB in size, and a pro account will let you work with models up to 200MB in size. Sketchfab will optimize the model if needed, as well as convert it to other formats that you can download. It also offers a viewer and model inspector that give you the ability to add annotations, lighting and other customizations.
With Sketchfab, the easiest way to include your model in a website is through the embed code that is provided after upload. With Sketchfab’s Viewer API, you can programmatically load a model into a webpage, which allows for custom interactions and camera control (see some examples and code here).
In our second demo, we used Sketchfab’s web interface to create a camera path by identifying keyframes and creating annotations at those points. The camera framing for each annotation can also be customized through the interface. We then used GSAP, an animation library for the web, to create a smooth camera path between our selected points based on the scroll position of the webpage. See the code here.


Demo 2 uses Sketchfab to display the photogrammetry model.
A NOTE ON THREE.JS
The next two demos use Three.js, a feature-rich javascript library for 3D content on the web. While it allows for a great deal of customization and control over how your 3D model will load, using Three.js is more complex than the above two approaches. Three.js comes with loaders for several model formats such as glTF, OBJ and FBX, as well as a variety of control mechanisms such as orbit controls and first-person controls.
R&D has built two open-source libraries to augment what is already provided by Three.js, including a 3D Tiles loader for loading large models that are in the 3D Tiles format and a camera toolkit that you can use to create your own controls schemes.
In demos 3 and 4 below, you can explore two examples we created to showcase some of the features available within Three.js.
Demo 3: glTF Model + Scroll Controls
This demo loads a fairly compressed glTF model (1 million triangle count, six 2K texture, using Draco compression) and a camera path designed in Maya. As a viewer scrolls through the webpage, they can scrub through the camera animation to move through the model. We’ve found this approach to be a versatile and immersive storytelling technique.


Demo 3 uses our open-source camera control library to scroll through the photogrammetry model.
HTML/CSS SETUP
This demo document is set up with a wrapper for the canvas element, followed by a long div to create the scrollable area that will drive the camera animation. Both these elements are wrapped in another div, and the canvas wrapper is marked as “sticky” so that it stays in place while we scroll.
<div class="scene">
  <div class="canvas-parent">
  </div>
  <div class="scroller">
    <!-- additional markup for elements overlayed on the scene can go here -->
  </div>
</div>
    .scene {
      position: relative;
    }

    .canvas-parent {
      width: 100vw;
      height: 100vh;
      touch-action: none;
      position: sticky;
      top: 0;
      z-index: -1;
    }

    .scroller {
      top: 0vh;
      width: 100vw;
      height: 800vh;
      z-index: 2;
    }
THREE.JS SETUP
In our JavaScript file, components are loaded from Three.js, along with the glTFLoader and DRACOLoader. Components are also loaded from R&D’s open-source controls library, three-story-controls. This includes the boilerplate code needed to get started.
import { Scene, PerspectiveCamera, WebGLRenderer, MeshBasicMaterial } from 'three'
import { GLTFLoader } from 'three/examples/jsm/loaders/GLTFLoader'
import { DRACOLoader } from 'three/examples/jsm/loaders/DRACOLoader'
import { CameraRig, ScrollControls, ThreeDOFControls } from 'three-story-controls'

const canvasParent = document.querySelector('.canvas-parent')
// The scrollElement will be passed to the controls
const scrollElement = document.querySelector('.scroller')

const scene = new Scene()
const camera = new PerspectiveCamera(75, canvasParent.clientWidth/canvasParent.clientHeight, 0.001, 1000)
const renderer = new WebGLRenderer()
renderer.setSize(canvasParent.clientWidth, canvasParent.clientHeight)
canvasParent.appendChild(renderer.domElement)

// Render loop
function render(t) {
  window.requestAnimationFrame(render)
  renderer.render(scene, camera)
}

// Update the camera aspect ratio and renderer size when the window is resized
window.addEventListener('resize', () => {
  camera.aspect = window.innerWidth / window.innerHeight;
  camera.updateProjectionMatrix();
  renderer.setSize(window.innerWidth, window.innerHeight)
})

render()
LOADING THE MODEL
The Three.js gLTF loader is initialized with a reference to a DRACO loader instance, and used to load the model. Three.js often interprets the textures that come with the model as lit materials (materials that respond to light). However, for photogrammetry models, we rarely want to use lit materials, as the surface normals are often not resolved smoothly. This code traverses the model and replaces all the materials with unlit materials, while maintaining the material’s map (texture).
const loader = new GLTFLoader()
const dracoLoader = new DRACOLoader()
dracoLoader.setDecoderPath('https://unpkg.com/three/examples/js/libs/draco/')
loader.setDRACOLoader(dracoLoader)

loader.load(
  MODEL_GLB_PATH,
  function(model) {
    model.scene.traverse( child => {
    if(child.isMesh) {
      const map = child.material.map
      child.material = new MeshBasicMaterial({map})
    }
    scene.add(model.scene)
  }
)
CONTROLS
To set up the controls, the camera is first wrapped in a CameraRig object. The animation is loaded with the gLTF loader, and then extracted and provided to the rig with the names for the translation and rotation objects as they were set in Maya.
ScrollControls and ThreeDOF Controls are set up, which will allow the camera to diverge slightly from its position on the path so viewers can look around. Both controls are updated in the render loop.
const rig = new CameraRig(camera, scene)
let scrollControls, threeDOFControls

loader.load(
  CAMERA_GLB_PATH,
  function (camera) {
    rig.setAnimationClip(camera.animations[0], 'translation_null', 'rotation_null')
    rig.setAnimationTime(0)
    scrollControls = new ScrollControls(rig, {scrollElement})
    threeDOFControls = new ThreeDOFControls(rig)
    scrollControls.enable()
    threeDOFControls.enable()
  }
)

// Render loop
function render(t) {
  window.requestAnimationFrame(render)
  // Update the controls
  if(rig.hasAnimation) {
    scrollControls.update(t)
    threeDOFControls.update(t)
  }
  renderer.render(scene, camera)
}


Demo 4 uses our open-source 3D tile streaming library to load the photogrammetry model.
Three.js does not support loading 3D Tiles natively, but with R&D’s open-source tile loader, a tiled model can be loaded into a scene much like any other kind of asset. The loader offers a number of customization options to optimize performance, set custom materials and shading, set the initial transform for the model and more.
We recommended using Draco compression on the tileset and converting the textures to Basis format for optimal performance, which can be done with this tool. We cover this in more detail in the previous guide, Processing and Aligning 3D Scenes.
For this demo, we identified points of interest with the three-story-controls library, using the camera helper tool and exported the data to use with the StoryPoints control scheme. While it is beyond the scope of our guide to dive too deeply into this, those interested can explore our code here.
// Loading 3D Tiles in a three.js scene
import { Scene, PerspectiveCamera, WebGLRenderer, Clock } from 'three'
import { Loader3DTiles } from 'three-loader-3dtiles'

const renderer = new WebGLRenderer()
const camera = new PerspectiveCamera(75, window.innerWidth/window.innerHeight, 0.1, 1000)
const scene = new Scene()
const clock = new Clock()

let tilesRuntime

Loader3DTiles.load(
  {
    url: TILESET_URL,
    renderer: renderer,
    options: {
      dracoDecoderPath: 'https://unpkg.com/three@0.129.0/examples/js/libs/draco',
      basisTranscoderPath: 'https://unpkg.com/three@0.129.0/examples/js/libs/basis',
    }
  }
).then(result => {
  const { model, runtime } = result
  tilesRuntime = runtime
  scene.add(model)
})


function render(t) {
  const dt = clock.getDelta()
  if (tilesRuntime) {
    tilesRuntime.update(dt, renderer, camera)
  }
  renderer.render(scene, camera)
  window.requestAnimationFrame(render)
}
A NOTE ON OPTIMIZING 3D TILES
When simplifying models for 3D Tiles streaming in RealityCapture, we recommend creating a 10 million triangle mesh with a fixed texel size style, and texel size set to optimal at 8192 x 8192 resolution (which will yield a large texture count based on the size of the model).
Get in Touch
We hope you have found our photogrammetry guides useful. Email us at rd@nytimes.com or tag us on Twitter @NYTimesRD — we’d love to see what you make!