- Installing Unity
- The Project Setup
- Create a Hero
- Make the Hero Bounce
- Add a First-person Perspective
- Program the Controller
- Create Platforms Procedurally
- Add a Game Menu
- Add a Button to Start the Game
- Publish Your Project as a WebGL Browser Game
- Where Do We Go from Here?
- Frequently Asked Questions (FAQs) about Creating a WebGL Game with Unity 5 and JavaScript
Unity is a cross-platform game engine used to develop video games for PCs, consoles, mobile devices and websites. The latest version (Unity 5) shipped with a WebGL exporter which means that developers can publish their games to the web with ease. As the name suggests, The WebGL exporter takes advantage of WebGL, a JavaScript API for rendering interactive 3D computer graphics and asm.js, the Mozilla-developed subset of JavaScript that’s touted as an “assembly language for the web”. You can read more about Asm.js and WebGL for Unity and Unreal Engine here.
In this tutorial I’m going to show you how to get up and running with Unity. I’ll also show you how to create a simple game in Unity using JavaScript and how to export your game to the web.
You can check out the finished game here (you’ll need a WebGL-capable desktop browser), or you can download both the game files and the project files from our GitHub repo.
So let’s get started …
A Word About JavaScript in Unity
When we talk about JavaScript in Unity, we are actually talking about UnityScript, which is something of a typed JS dialect. Unity themselves often refer to this JavaScript, yet more cynical observers think that “Unity does JavaScript” is something of a marketing ploy. Either way, we should be clear about the fact that UnityScript does not conform to any ECMAScript specification — nor does it try to. You can find a good overview of the differences here.
Installing Unity
To start this tutorial, we need to have a running Unity version, that can be downloaded here. Unity has installers for Windows and Mac OS X. Linux users can possibly run Unity via Wine, but your mileage may vary.
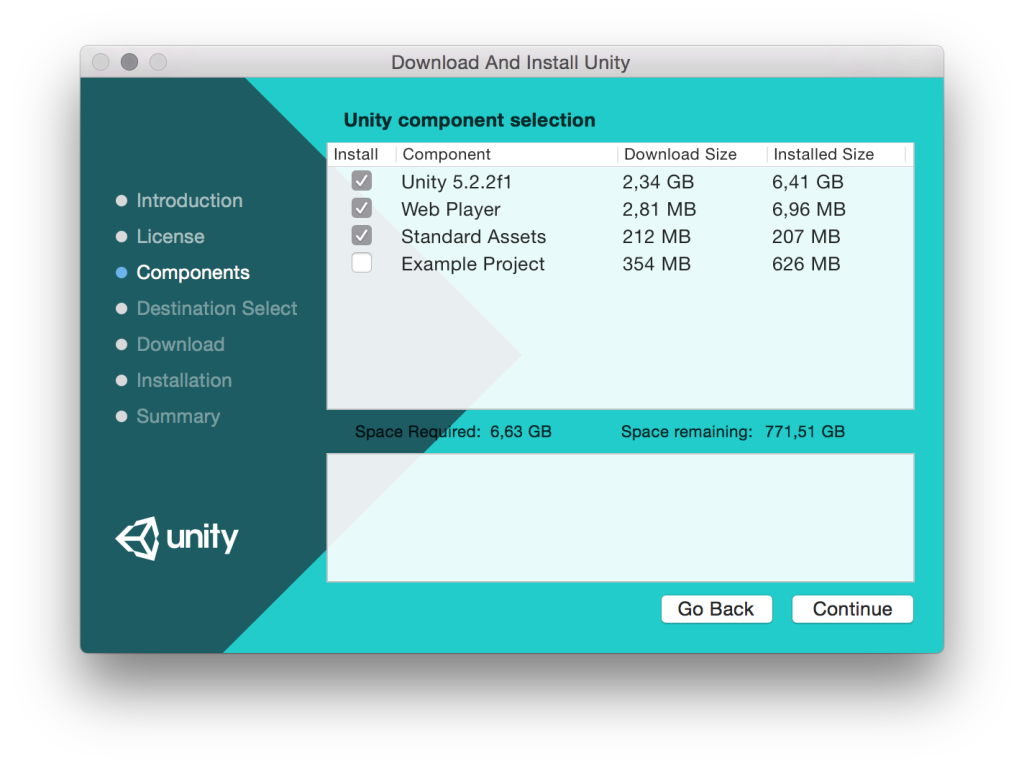
After installation, we’re good to go! So let’s open Unity and create a new 3D project.
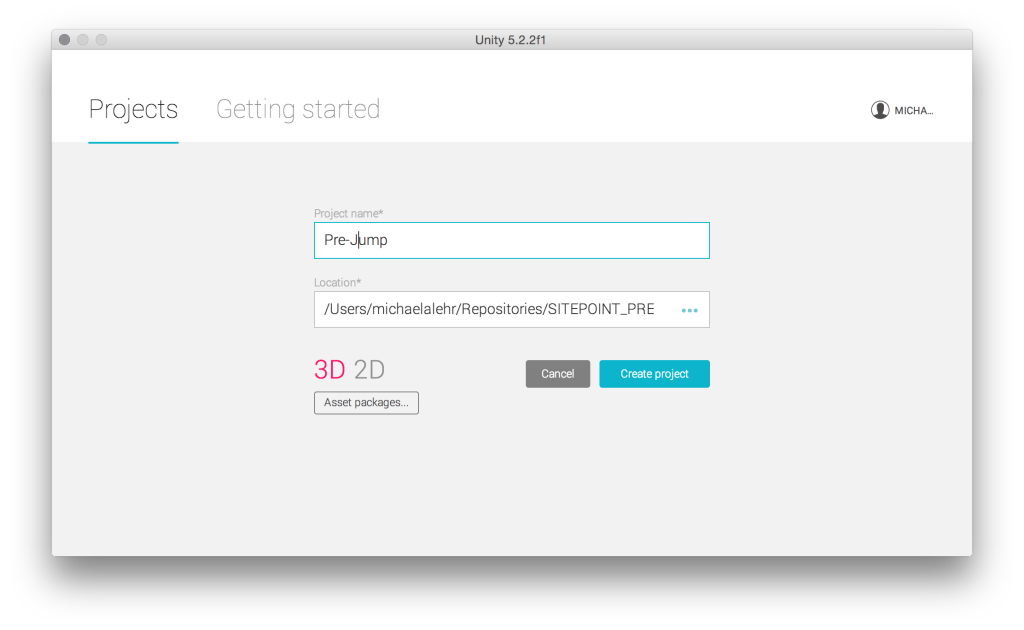
The Project Setup
Once Unity opens for the first time, we should take a minute to find our way around the main window:
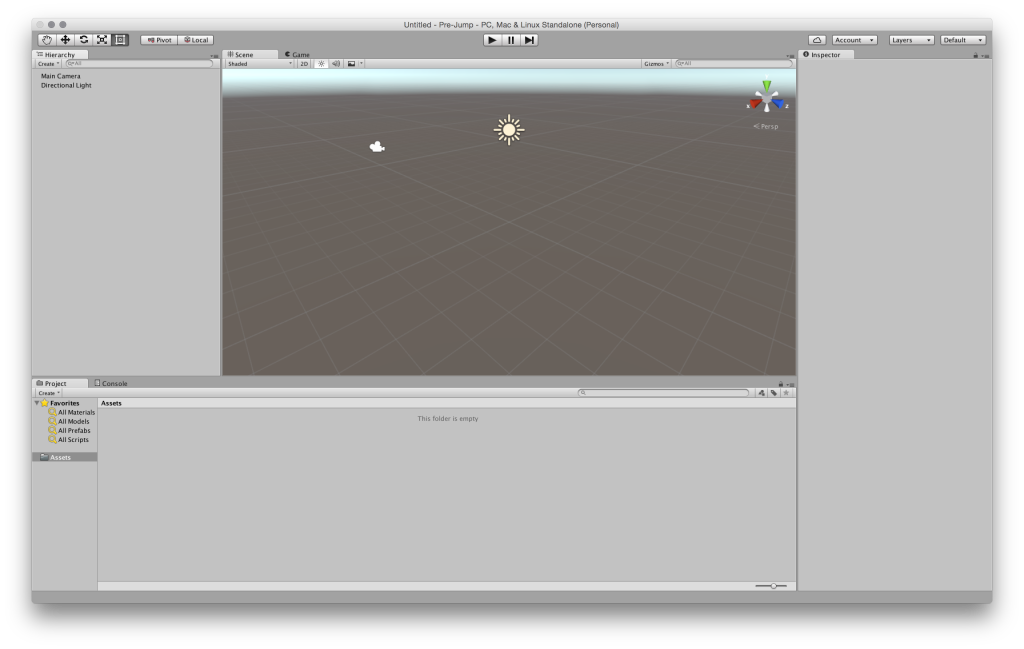
- The leftmost panel is the Hierarchy, which outlines all the elements in the current scene. A scene is something like a view of the game, e.g. a level or the menu. At the moment there should be a Main Camera element and a Directional Light element.
- In the middle is the Scene view, illustrating the camera and light in 3D space with icons.
- There is a Game tab next to the Scene tab, showing the game itself, as it would be seen by a player. This is made for testing the game in the editor.
- On the right-hand side there is the Inspector panel, where element settings may be modified. Let’s try it out by clicking on Directional Light in the Hierarchy. We should now see lots of information about this light and be able to turn off its shadows with Shadow Type: No Shadows.
- At the bottom is the Project window, which displays a view of the files we need to develop our game.
Now that we are familiar with Unity’s interface, there is one thing left to do, before beginning with the development: save the current scene. File > Save Scene opens a Save Scene dialog that leads to a folder called Assets. One common way to organize files in Unity is with subfolders. So add a new folder to the Assets folder named Scenes and save the scene in this folder with the name Level.unity.
Create a Hero
Our game will consist of a hero, jumping higher and higher from platform to platform. If it misses one and falls into oblivion, the game will be lost. So let’s start by creating the hero. Because a player will see the game from a first-person perspective, the hero’s appearance doesn’t really matter and we can use standard sphere geometry. The benefits of a sphere are that it may be created in few steps and that it suits the physics we need for jumping. Add the sphere by clicking Create in the Hierarchy and edit the following properties with the Inspector:
Position { X: 0, Y: 2.5, Z: 0 }
Scale { X: 0.3, Y: 0.3, Z: 0.3 }
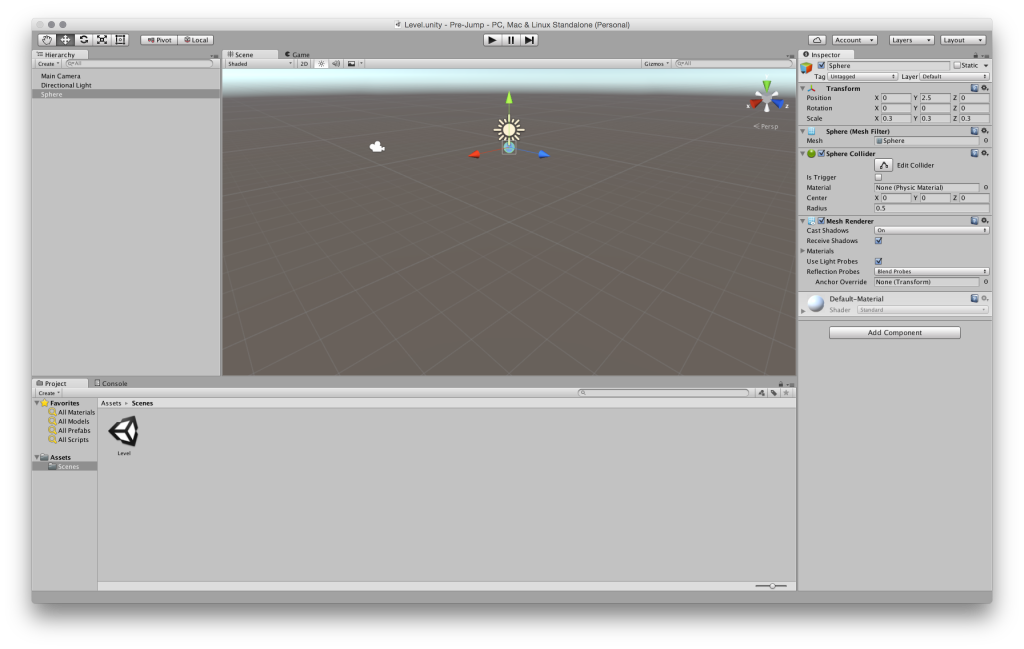
Let’s test what we’ve done by pressing the play button. We should see a sphere in 3D space in front of a skyline.
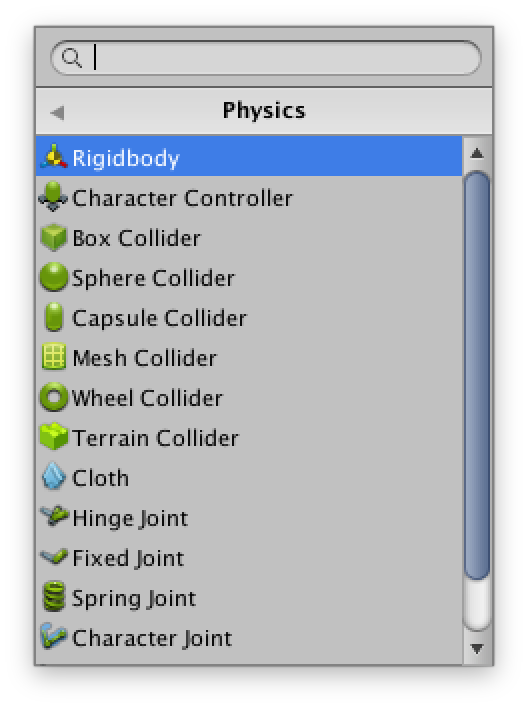
To make the hero fall, it has to gain weight. Thus we need to add a component to the sphere by clicking the corresponding button in the Inspector and selecting Rigidbody. And since we do not want the hero to rotate, we freeze it in the Rigidbody component by opening Constraints and selecting all the axes in the Rotation row. When playing the scene again, we should be able to watch the hero fall.
To save the hero from a never-ending fall, we will create a flat box that serves as a platform. For that, we have to add a cube and set the Scale.Y value to 0.1. Replaying the scene confirms that the hero lands safely on the platform, although I must admit that it doesn’t really look natural. So how do we get the hero to bounce? By adding some physics materials.
Make the Hero Bounce
First of all, we need to create a new physics material for the sphere to make it bouncy. To do this create a new folder in the Assets folder called Materials and in here create a new physics material. Let’s call it Bouncy_Sphere. The values we need to adjust in the Inspector are:
Dynamic Friction: 10
Static Friction: 10
Bounciness: 1
Friction Combine: Maximum
Bounce Combine: Maximum
If we add this material to the Sphere Collider, this will make the sphere bounce up and down, but always to an equal height. To make the sphere jump higher and higher with each single bounce, we have to add some physics material to the platform too. For this, we create another material called Bouncy_Platform and change its values to:
Dynamic Friction: 0.9
Static Friction: 0.9
Bounciness: 1
Friction Combine: Average
Bounce Combine: Multiply
To achieve consistency here, we should also rename the cube element to Platform, by clicking on it twice in the Hierarchy. When we start the game now, we can notice that the sphere jumps higher and higher each time.
We will also create a new standard material called Platform to give the platform some color. After creating this material, use #C8FF00 as the Albedo color (Albedo is the label in the Unity UI) and then drag and drop this material onto the platform element. It should now be yellow.
Add a First-person Perspective
To add a first-person perspective, we drag and drop the camera (in the Hierarchy) onto the sphere. This will make the camera a child element of the hero and cause the camera to follow the sphere while it’s moving. The camera properties also have to be adjusted to:
Position { X: 0, Y: 1, Z: 0 }
Rotation { X: 90, Y: 0, Z: 0 }
Scale { X: 2.5, Y: 2.5, Z: 2.5 }
Clear Flags: Solid Color
Background: #000
Field of View: 80.3
We will also create a spotlight as second child of the sphere. This will give the player a sense of the hero’s current jumping height. Adjust the values of the spotlight to:
Rotation { X:90, Y:0, Z:0 }Program the Controller
Our goal is to use the mouse or trackpad to allow the player to move in a particular direction. For this, we’ll write our first script. As with Rigidbody a script is added to a game element as a component. In our case we will add a JavaScript script with the name InputController to the camera. Also, as with the scene and both materials, we should create a new folder named Scripts in the Project panel. This should contain the script . By double-clicking the new script, Unity will open it in the default editor MonoDevelop. The default editor may be changed to any editor (Unity > Preferences > External Tools), but that’s not important right now.
As you will see, the script already contains some code. First of all, we have to create some variables after line 1, #pragma strict (which in the Unity context enforces typing).
#pragma strict

public var Hero : GameObject;
private var halfScreenWidth : float;
private var  halfScreenHeight : float;

function Start () {}

function Update () {}
The first variable is public and of the type GameObject; it must reference the sphere. Switching back to Unity with the camera still selected, we can see this public variable next to an input field with an empty value. Let’s us drag and drop the sphere into this slot and in so doing assign a value to the variable.
Both of the other variables are private and will be assigned their values in the Start function. This function is called once, after starting the scene. Both private variables will be assigned half of the current screen width and height respectively, for which we use Unity’s built-in Screen class:
function Start () {
  halfScreenWidth = Screen.width / 2;
  halfScreenHeight = Screen.height / 2;
}
The only thing left to do in the InputController script is to get the values from the mouse, whenever it is moved. For this we use the Update function, which is called for every frame:
function Update () {
  var x : float = 0.0;
  var z : float = 0.0;

  x = ( Input.mousePosition.x - halfScreenWidth ) / halfScreenWidth;
  z = ( Input.mousePosition.y - halfScreenHeight ) / halfScreenHeight;

  Hero.GetComponent( HeroController ).SetPosition( x, z );
}
Both new variables x and z stand for the corresponding axis. As we look down the y-axis, we see a horizontal x-axis and a vertical z-axis. On these axes we want to adjust the hero’s position after receiving mouse input. To do this we use Input.mousePosition, which returns a two-dimensional vector. The vector, whose zero value is bottom-left, has to be processed into our coordinate system with its origin in the middle of the screen. This happens in the following lines. To conclude, we call a function setHeroPosition with both computed values as arguments. We will write this function in a new script called HeroController attached to the sphere:
#pragma strict

public function SetPosition ( x : float, z : float ) {
  transform.position.x = x;
  transform.position.z = z;
}
Let’s test our code by moving the mouse or trackpad and causing the hero to fall from the platform.
Create Platforms Procedurally
For the automatic creation of platforms, we need some kind of platform template. This is called a “prefab” in Unity. To create a prefab, we have to drag and drop the platform from the Hierarchy into a new assets folder, which (consistent with our naming convention) is called Prefabs. Prefabs may be recognized in the Hierarchy by their blue color. All the platforms (with the exception of the first) will be created via a new script called GameManager, which is attached to the camera. We start this script by referencing the necessary variables:
#pragma strict

public var Platform : GameObject;
public var Hero : GameObject;

private var boundary : float;
private var rotation: Quaternion;
private var lastPlatformPosition : Vector3;

function Start () {
  boundary = 1.0;
  rotation = Quaternion.identity;
  lastPlatformPosition = new Vector3( 0, 0, 0 );
}

function Update () {}
We need to reference the prefab panel and the sphere, so both must be dragged and dropped in their particular slots in the editor. We are also creating three private variables, which will be used to instantiate the prefab panel:
- The boundary marks a limit on the y-axis. Whenever the hero jumps higher than this, a new panel must be created.
- The second variable is a rotation needed to instantiate prefabs. The value
Quaternion.identityresults in no rotation at all, which is exactly what we need. - The variable
lastPlatformPositionsaves the position of the last platform as a three-dimensional vector.
For every frame we will now check, whether the sphere is above the boundary or not. If it is we will raise the boundary and instantiate a new panel:
function Update () {
  if ( Hero.transform.position.y > boundary ) {
    var position : Vector3;

    boundary += 1.0;
    position = getNextPlatformPosition();
    Instantiate( Platform, position, rotation );
  }
}
Next we can add the code to get the next panel position. We’ll place this in an extra function so as to maintain readability:
private function getNextPlatformPosition () {
  var position : Vector3;

  do {
    position = new Vector3( Random.Range( -1, 2 ), boundary, Random.Range( -1, 2 ) );
  } while ( position.x == lastPlatformPosition && position.z == lastPlatformPosition );

  lastPlatformPosition = position;

  return position;
}
To make sure that the position vector’s new x and z values are not the same as the previous ones, we use a do while loop. Unity’s Random.Range function is the proper way, to get random values for the x and z values. In both cases we want them to be between -1 and 2. Finally we save the new position as the panel’s last position and return it.
Add a Game Menu
In this state a player can jump higher and higher on platforms by moving the mouse in the respective direction. But if the player falls off and misses all platforms on the way down, the sphere will fall endlessly. This is what we want to fix now. We will check, if a sphere falls down below the first platform and in this case load a new scene.
First, let’s check whether the hero is falling below a certain point. To do so let’s edit the if statement in the update function of the GameManager script. The else if statement will check, whether the sphere’s y-position is below -2.0 units. In this case we call a private function gameOver:
function Update () {
  if ( Hero.transform.position.y > boundary ) {
    var position : Vector3;

    boundary += 1.0;
    position = getNextPlatformPosition();
    Instantiate( Platform, position, rotation );
  } else if (Hero.transform.position.y < -2.0) {
    gameOver();
  }
}
We will use a new function for handling the game over state, which looks like this:
private function gameOver () {
  Application.LoadLevel( 'Menu' );
}
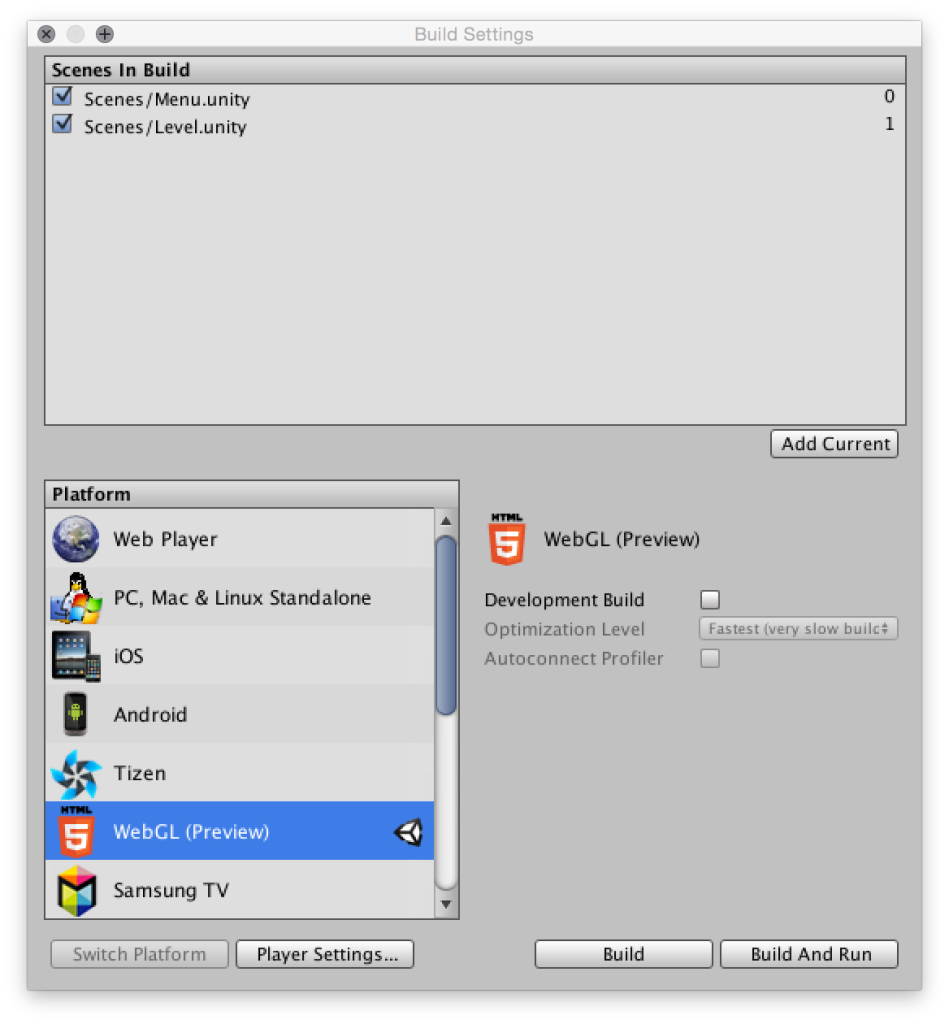
Here we’re using Unity’s Application class, which gives us access to the method LoadLevel that we can use to load a new scene named Menu. To make this code work, we first have to create the scene via File > New Scene and then save it with the name Menu. Afterwards we need to add both scenes to the build process. The build settings may be opened with File > Build Settings. The menu scene should stillbe open, so let’s click the Add Current button, to add the scene to the build settings. Repeat this action with the level scene open. Now when we finish the game, we should be taken to the newly created game menu scene.
Add a Button to Start the Game
To make the game playable, we need to create a game menu with a play button. Let’s switch over to the game menu scene and first adjust the camera settings in the Inspector to:
Clear Flags: Solid Color
Background: #000
Width: 200
Height: 60
To add a button, we use Unity’s UI elements, which can be added like 3D elements through the Hierarchy. After adding a UI button, we should see the following new elements in the Hierarchy:
- an EventSystem element and
- a Canvas element with
- a child Button element and
- its child Text element.
A canvas is the container for all UI elements and it can be made sort of responsive. To do this, we have to switch the Canvas Scaler: UI Scale Mode setting in the Inspector from Constant Pixel Size to Scale With Screen Size. Now we can change the button’s position:
Rect Transform { Pos X: 0, Pos Y: 0, Pos Z: 0 }
Rect Transform { Width: 200, Height: 60 }
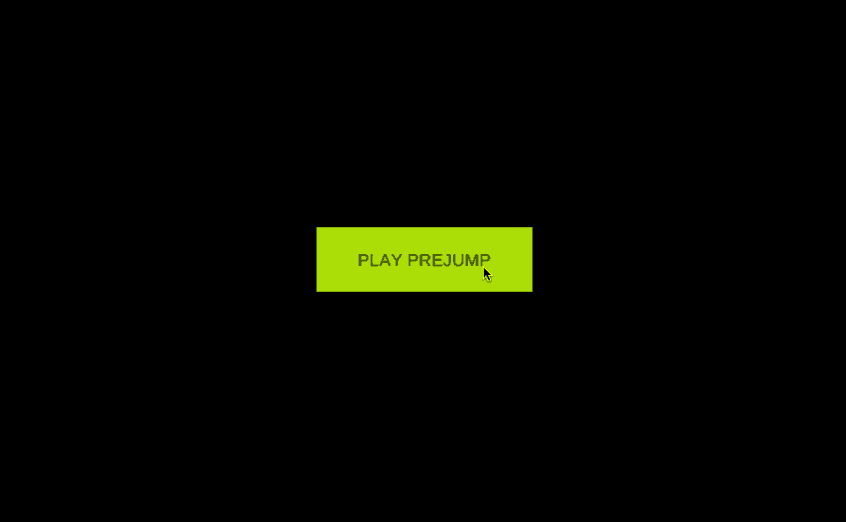
Removing the button’s source image and setting the color to #C8FF00 will make the menu a bit nicer. Finally, we change the text by editing the Text element’s text to “PLAY PREJUMP” and setting a font-size of 16. To make the button work, we will use a new function that we will add to a new UIController script on the Button element. It consists of a single function to load the level scene:
public function StartGame () {
  Application.LoadLevel( 'Level' );
}
We can apply this function in the button’s Inspector settings. In the Button (Script) component settings, we can execute a function whenever a player clicks it. For this, we add a new function to the On Click () event, by clicking the + icon. Now we can drag and drop the button itself onto the input field. Then we select the function we just wrote from the UIController script (UIController.StartGame).
Publish Your Project as a WebGL Browser Game
Unity is able to export a project as a WebGL application. With the build settings opened, we select WebGL as the platform. We then switch the export destination by clicking the Switch Platform button. Afterwards we just have to click the Build button and select a name for our game. When the build process is finished, we can open the html file with a WebGL-capable desktop browser .
Where Do We Go from Here?
Of course this little game can be improved, for example with scores, more platform types, additional input methods, audio, and so on. But what we’ve seen in this tutorial is, that the cross-platform game engine Unity offers a combination of a WYSIWYG editor and scripting possibilities, that we can use with a JavaScript-similar language. Depending on our particular project requirements, Unity may be a nice alternative to WebGL frameworks.
Are you using Unity in your projects? Have you used Unity to make a cool game you’d like to share? Let me know in the comments below.
Frequently Asked Questions (FAQs) about Creating a WebGL Game with Unity 5 and JavaScript
How Can I Optimize My WebGL Game for Better Performance?
Optimizing your WebGL game is crucial for ensuring smooth gameplay and a better user experience. Start by reducing the number of draw calls. This can be achieved by using fewer materials and combining meshes. Also, consider using Level of Detail (LOD) to reduce the complexity of distant objects. Compress your textures and audio files to reduce the game’s overall size. Lastly, use Unity’s Profiler to identify and fix performance bottlenecks.
Can I Use WebGL for Mobile Game Development?
Yes, you can use WebGL for mobile game development. However, it’s important to note that WebGL games can be more resource-intensive than native apps. Therefore, you need to optimize your game carefully to ensure it runs smoothly on mobile devices. This includes reducing the game’s size, optimizing graphics, and ensuring the game is responsive to different screen sizes.
How Can I Debug My WebGL Game?
Debugging a WebGL game can be challenging due to the lack of direct debugging support in Unity. However, you can use browser-based tools like Chrome’s Developer Tools or Firefox’s Web Console for debugging. These tools allow you to view console logs, monitor network activity, and inspect WebGL shaders.
How Can I Add Multiplayer Functionality to My WebGL Game?
Adding multiplayer functionality to a WebGL game requires a backend server to manage the communication between players. You can use Unity’s built-in networking system, UNet, or third-party solutions like Photon. These tools provide APIs for managing player connections, synchronizing game state, and handling real-time communication.
How Can I Monetize My WebGL Game?
There are several ways to monetize a WebGL game. You can use in-game advertisements, in-app purchases, or a freemium model where players can play the game for free but pay for additional features or content. You can also sell your game on platforms like the Unity Asset Store or Steam.
How Can I Improve the Graphics of My WebGL Game?
Improving the graphics of your WebGL game can be achieved by using high-quality textures, implementing advanced lighting techniques, and using shaders for special effects. Unity’s Standard Shader is a versatile tool that can help you achieve realistic visuals. Also, consider using post-processing effects to enhance the overall look of your game.
How Can I Make My WebGL Game Responsive to Different Screen Sizes?
To make your WebGL game responsive, you need to use Unity’s UI system which allows you to create flexible and scalable user interfaces. You can also use the Screen class to get information about the player’s screen size and adjust your game accordingly.
How Can I Add Sound Effects and Music to My WebGL Game?
You can add sound effects and music to your WebGL game using Unity’s audio system. You can import audio files into your project and use the AudioSource and AudioClip classes to control the playback. You can also use the Audio Mixer to create complex soundscapes by blending and modifying sounds.
How Can I Protect My WebGL Game from Cheating?
Protecting your WebGL game from cheating can be challenging due to the open nature of JavaScript and WebGL. However, you can implement measures like server-side validation of game data, obfuscating your JavaScript code, and using secure communication protocols to reduce the risk of cheating.
How Can I Update My WebGL Game After Publishing?
Updating a WebGL game after publishing involves recompiling the game in Unity with your changes and then uploading the new build to your server. It’s important to ensure that your updates don’t break existing functionality and that they are compatible with saved game data.
Michaela is a front-end developer and UX designer from Berlin. She has co-founded the development studio GeilDanke. In her free time she enjoys making games, practicing yoga, surfing and knitting.