
From the BLINK tag of the early 90’s to today’s modern CSS3 transitions and animations, the ability to move elements on web pages/applications has been always a tempting goal.
Today, technologies like SVG make it relatively easy to create an effect that I’m going to call the ‘Invisible Pen’ effect. This is where the viewer watches an illustration appear line-by-line, as if drawn by an invisible pen.
The idea isn’t new. Back in 1953 in ‘Duck Amuck‘, an unseen hand (later revealed to be Bugs Bunny) famously torments poor Daffy Duck by constantly erasing and redrawing the world around him. It’s a surreal masterpiece.
Fast forward to 2013, and Jake Archibald cleverly demonstrated how you could manipulate stroke-dashoffset, stroke-dasharray and some CSS to create this ‘magic pen effect’ on any SVG path.
Jake’s approach is easy to implement on relatively simple SVG linework, but it’s not always the ideal solution when we want to create something more complex. For more complicated linework animations there are purpose-built tools to help you such as Vivus.js. Vivus is a lightweight JavaScript library which allows us to animate the SVG elements without messing around too much with CSS.
I suppose the main question popping into your head now is: What makes Vivus better solution than the pure CSS approach?
In my opinion, Vivus has three main advantages which should be mentioned:
-
Ease-of-use: In Vivus, we control most of our animation properties in a Vivus ‘constructor object’ and in context along with our SVG document. This makes changes more convenient and intuitive to work with. With only a couple of tweaks we can get a completely different animation result.
-
Automation: As you may already know, SVG’s
stroke-dashoffsetproperty – the key to this effect – is only available onpathelements. This can cause problems if your SVG drawing containscircle,rectangle,line,polylineor other common SVG ‘non-path’ objects.Fortunately, Vivus is smart enough to automatically convert all SVG objects into path elements making it possible for us to animate them too. This is a huge advantage.
However, do note that we need to transform all
textelement manually into paths, using a vector editor such as Illustrator, InkScape, and alike. -
Flexibility: Vivus offers five preset animation types, along with a lot of options for manipulation, which gives us great flexibility about our animation’s behavior.
Now, let’s start exploring Vivus in more detail and see these advantages in action.
Attention designers: Yes, there is some code ahead, but Vivus is designed to be used by designers. Even if you’re not a hardcore codemonkey, a little cut, paste and edit will get you some pretty cool results.
Exploring Vivus
To start using Vivus we need to include it in our HTML like this:
<script src="https://cdnjs.cloudflare.com/ajax/libs/vivus/0.3.2/vivus.js"></script>Then, we can use an inline SVG in the following manner:
<svg id="canvas">
  <path...>
  <path...>
  <path...>
</svg>
And the script:
<script>
  new Vivus('canvas', {duration: 300}, callback);
</script>
Here, we have an inline SVG and a Vivus constructor function which takes three parameters:
-
ID of the DOM element we want to interact with (our ID is ‘canvas’).
-
An option object where we put all the animation options.
-
And an optional callback function called at the end of the animation.
Before we move on, we need to know the following:
-
By default Vivus draws elements in the same order as they are defined in the SVG document.
-
All SVG elements must have a stroke property and cannot be filled.
-
We must not put any hidden path elements in our SVG. Otherwise the animation might not be displayed properly.
-
Text elements cannot be converted into path elements. If you want to use text in our animation we need first to transform it into paths (in editor like Illustrator, InkScape).
The Five Drawing Options of Vivus
In the next sections we’ll explore all five animation types offered by Vivus. We’ll use a very simple drawing (four lines) in order to see clearer the difference between the available animation options.
Delayed
See the Pen Vivus demo: Simple line animation with delay by SitePoint (@SitePoint) on CodePen.
Here our SVG drawing consists of four lines with equal length. In delayed mode, which is the default animation, all paths start almost simultaneously with a small delay between each one.
One-By-One
See the Pen Vivus demo: One-by-one by SitePoint (@SitePoint) on CodePen.
In oneByOne mode each path is drawn one after the other. In the example above the same four lines are drawn one by one in a continuous manner.
Async
See the Pen Vivus demo: Asynchronous example by SitePoint (@SitePoint) on CodePen.
In async mode each path is drawn asynchronously. In the example above lines with different lengths are used in order to see more clearly that lines start and finish at the same time regardless their different lengths.
Scenario
This and the next animation type give us ability to set animation properties directly in the DOM of the SVG. This allows us to gain more control over our animation and refine it much more precisely.
In scenario mode we just have to define the start time and duration of each path element with data-start and data-duration attributes. If it is missing, it will use the default value given to the constructor.
See the Pen Vivus Demo: ‘Scenario’: Custom line drawing speed by SitePoint (@SitePoint) on CodePen.
In the example above the second line starts first, then the third line is drawn quickly, next the first line starts, and finaly, the last line starts when the first one is in the middle of its way and they both finish at the same time. Here is the simplified scheme of our SVG:
<line data-start="200" data-duration="200" .../>
<line data-start="0" data-duration="100" .../>
<line data-start="100" data-duration="10" .../>
<line data-start="300" data-duration="100" .../>
As we can see to direct our animation we just need to perform simple math calculations. And here is where the Vivus’ flexibility shines. We don’t have to respect the original order of the SVG. We can start with whichever element we wish and continue with all the others in whatever order we need.
Scenario-Sync
In scenario-sync mode, the default behavior is the same as in oneByOne mode. However, we can further refine the animation by targeting some attributes to specific path items such as:
-
data-duration– to define the duration of the path animation -
data-delay– to define the delay between the end of the animation of the previous path and the start of the current path -
data-async(no value required) – to make the drawing of the path asynchronous i.e. the next path will start at the same time. If a path does not have an attribute for duration or delay then the default values, set in the option object, will be used.
See the Pen Vivus Demo: Scenario sync by SitePoint (@SitePoint) on CodePen.
In the example above the first line is drawn with the default duration of 200ms. The second line starts with a delay of 100ms and the same duration. The third line starts immediately after the second one and continues 300ms. Because the third line has data-async property, the last line starts at the same time as the third but finishes before it because it has a duration of 200ms.
Here is the simplified scheme of our SVG:
<line .../>
<line data-delay="100" .../>
<line data-duration="300" data-async .../>
<line data-duration="200" .../>
Complete Examples
Now, when we already understand the different types of animation offered by Vivus, it’s time to test them in a more practical and realistic way. In this section, we’re going to create two complete animations using the `delayed` and `scenario-sync` modes.Car Blueprint Drawing
In the first example, we’ll create this blueprint from a Seat Leon: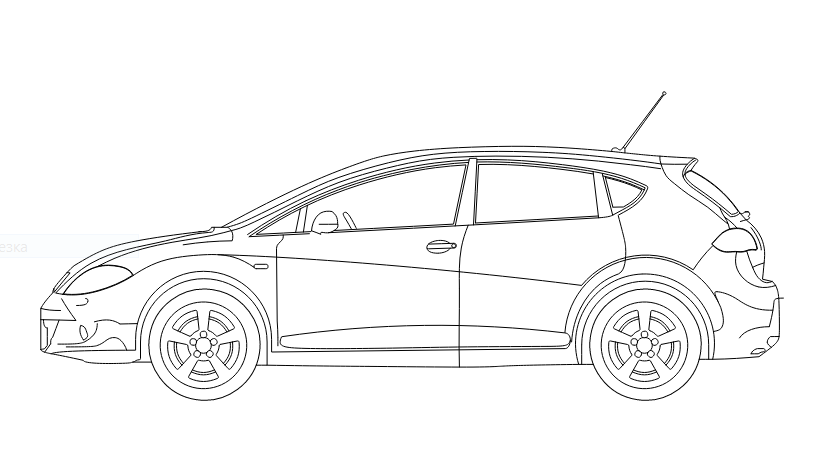
<script> tag, we create a new Vivus constructor pointing to our SVG by using canvas ID. In the option object, we define the type of the animation to be delayed and the timing function for the entire animation.
We use for that the built-in timing method Vivus.EASE. As a result, the animation will start and ends more gently. We also add a callback function which will reset the drawing three seconds after the animation end and then will draw it again.
new Vivus('canvas', {
	  start: 'autostart',
	  type: 'delayed',
	  animTimingFunction: Vivus.EASE
	  },
	  function(car){
	    setTimeout(function(){ car.reset().play(); }, 3000);
	  }
);See the Pen Vivus Example: Car blueprint by SitePoint (@SitePoint) on CodePen.
As you can see, we get an amazing blueprint animation effect with minimum effort from our side.Rocket Drawing
In the second example, we’ll create a rocket illustration animation and integrate color. Our goal is to draw the rocket, fill it, and then remove the stroke. For the SVG code refer to the CodePen example at the end of this section.
We start again with a new Vivus constructor. This time we set the type of animation to
Our goal is to draw the rocket, fill it, and then remove the stroke. For the SVG code refer to the CodePen example at the end of this section.
We start again with a new Vivus constructor. This time we set the type of animation to scenario-sync and set pathTimingFunction to Vivus.EASE_OUT. We use a callback function which will add some CSS classes at the end of the animation. They will fill the rocket and will remove its strokes.
new Vivus('canvas', {
	  start: 'autostart',
	  type: 'scenario-sync',
	  pathTimingFunction: Vivus.EASE_OUT
	  },
	  function(obj){
	    obj.el.classList.add('fill-1', 'fill-2', 'fill-3', 'fill-4', 'fill-5', 'fill-6', 'fill-7', 'clear-stroke');
	  }
);<style> tag we initially set the path’s fill-opacity to zero and a transition for it with duration of 1s. Then we use CSS selectors to assign fill property for each element in the SVG and make it visible by setting the fill-opacity to 1. You can read more about this trick here.
And finally, we set the stroke for each path to none.
path {
	  fill-opacity: 0;
	  transition: fill-opacity 1s;
	}

	.fill-1 g:first-of-type > path{
	  fill: #1c8ece;
	  fill-opacity: 1;
	}

	.fill-2 g:last-of-type > path{
	  fill: #ffffff;
	  fill-opacity: 1;
	}

	.fill-3 path:first-of-type{
	  fill: #f4a260;
	  fill-opacity: 1;
	}

	.fill-4 path:nth-of-type(2){
	  fill: #ea3e2f;
	  fill-opacity: 1;
	}

	.fill-5 path:nth-of-type(3){
	  fill: #d1d2d4;
	  fill-opacity: 1;
	}

	.fill-6 path:nth-of-type(4),
	.fill-6 path:nth-of-type(5) {
	  fill: #000000;
	  fill-opacity: 1;
	}

	.fill-7 path:nth-of-type(6){
	  fill: #ffffff;
	  fill-opacity: 1;
	}

	.clear-stroke path{
	  stroke: none;
}data-duration and data-delay properties to build the animation according to our needs. data-async property is used to make the two wings of the rocket are drawn simultaneously.
Here is the simplified scheme of the SVG:
<path data-duration="50" .../>
<path data-duration="150" data-delay="100" .../>
<path data-duration="50" .../>
<path data-duration="50" .../>
<g> <polygon data-duration="300" data-async .../>
<polygon data-duration="300" .../>
</g> <path data-delay="25" .../>
<path .../>
<g> <polygon data-async .../> <polygon .../> </g>See the Pen Vivus Example: Rocket by SitePoint (@SitePoint) on CodePen.
Summary
As you can see, with Vivus we can concentrate primarily on our drawing idea and its practical realization, instead of juggling with CSS properties. Once we have our SVG document ready, it’s a relatively simple process to turn it into a working animation.
With a little bit of imagination and the animation capabilities of Vivus, we can create complex and interesting animations in no time.
Frequently Asked Questions about Creating the Invisible Pen Effect in SVG using Vivus.js
How can I install Vivus.js in my project?
To install Vivus.js in your project, you can use npm or yarn. If you’re using npm, run the command npm install vivus. For yarn, use yarn add vivus. After installation, you can import it into your project using import Vivus from 'vivus';. Alternatively, you can download the Vivus.js file from the GitHub repository and include it in your HTML file using the script tag.
Can I use Vivus.js with React or Angular?
Yes, Vivus.js can be used with both React and Angular. You can import the Vivus library into your component and use it to animate SVGs. However, you may need to use a wrapper or a custom directive to make it work seamlessly with these frameworks.
How can I control the speed of the animation?
The speed of the animation can be controlled using the duration parameter in the Vivus constructor. The duration is specified in milliseconds. For example, new Vivus('my-svg', {duration: 200}); will create an animation that lasts for 200 milliseconds.
Can I animate SVGs that are not in the DOM?
No, Vivus.js requires the SVG to be in the DOM to animate it. If your SVG is not in the DOM, you will need to add it before you can animate it with Vivus.js.
How can I make the animation start automatically?
By default, Vivus.js animations start when the SVG is in the viewport. If you want the animation to start automatically, you can set the start option to ‘autostart’ in the Vivus constructor. For example, new Vivus('my-svg', {start: 'autostart'});.
Can I use Vivus.js to animate SVGs on mobile devices?
Yes, Vivus.js works on both desktop and mobile devices. However, keep in mind that complex animations may not perform well on older or less powerful devices.
How can I repeat the animation?
To repeat the animation, you can use the reset method to reset the SVG to its original state, and then call the play method to start the animation again. For example, myVivus.reset().play();.
Can I animate a part of the SVG?
Yes, you can animate a part of the SVG by using the pathTimingFunction option in the Vivus constructor. This function determines the animation timing for each path in the SVG.
How can I change the color of the SVG during the animation?
Vivus.js does not provide a built-in way to change the color of the SVG during the animation. However, you can use CSS animations or JavaScript to change the color of the SVG paths during the animation.
Can I use Vivus.js with other animation libraries?
Yes, Vivus.js can be used in conjunction with other animation libraries like GSAP or Anime.js. However, keep in mind that using multiple animation libraries may increase the complexity of your code and the load time of your website.
 Ivaylo Gerchev
I am a web developer/designer from Bulgaria. My favorite web technologies include SVG, HTML, CSS, Tailwind, JavaScript, Node, Vue, and React. When I'm not programming the Web, I love to program my own reality ;)