CSS Filters are a powerful tool to manipulate images using just CSS. Once implemented in all browsers, you will be able to apply effects to images without any need for external software.
CSS filters constitute a huge topic in themselves and I am not going to discuss all the available filters here. What I am going to talk about is how you can use multiple filters to produce a complex effect – and make your own image editor.
If you want to dig deeper, feel free to check out Filters on MDN or Understanding CSS Filter Effects, on HTML5 Rocks, both of which cover the general topic of filters in more detail.
CSS Filter Syntax
To write a filter effect in your CSS, just use filter: and name of the filter (like grayscale, blur, etc.).
.example {
  filter: <filter-function> [<filter-function>];
}
Here’s how you would apply a 90% grayscale filter to an element:
.example {
  filter: grayscale(90%);
}
And in the case of webkit browsers, you’ll need a prefix:
.example {
  -webkit-filter: grayscale(90%);
}
The value of a filter’s property generally falls between 0 and 1, but there are a few exceptions. For example, the blur property uses pixel units and can be any whole number. Also, the hue-rotate filter value is a whole number with a ‘deg’ unit.
.example {
  filter: blur(10px);
}

.example-2 {
  filter: hue-rotate(90deg);
}
Combining Multiple Filters
You may combine any number of functions to manipulate the rendering. However, if you want to apply more than one filter effect, you can do so by space separating them in a single declaration. Here’s how you’d combine grayscale and blur:
.example {
filter: grayscale(0.5) blur(10px);
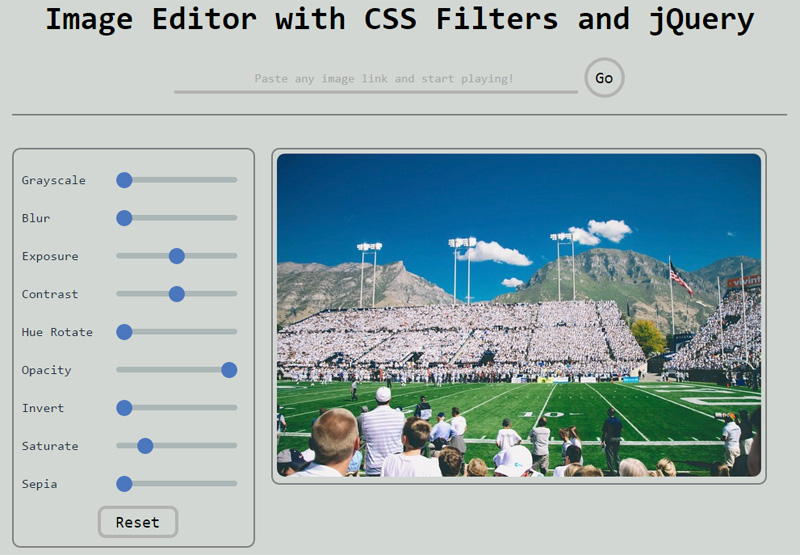
}Building the Image Editor
Our image editor will have two parts:
- A URL field and Image container, to allow loading an image through an external URL.
- Controls, which will be sliders to apply different effects on the loaded image.
URL Field and Image Container
We will use two form elements to ask for an image URL: A text input and a button. Then we will load the image present at the URL in our imageContainer div.
Here’s the HTML:
<!-- Form for collecting image URL -->
<form id="urlBox" class="center">
    <input class="url-box" type="url" id="imgUrl">
    <input id="go" type="button" value="Go">
</form>

<!-- container where image will be loaded-->
<div id="imageContainer" class="center">
    <img src="/default.png" alt="">
</div>
And here is the jQuery:
// adding an image via url box
function addImage(e) {
    var imgUrl = $('#imgUrl').val();
    if (imgUrl.length) {
        $('#imageContainer img').attr('src', imgUrl);
    }
    e.preventDefault();
}

// on click of go(submit) button, addImage() will be called
$('#go').click(addImage);

// on pressing return(enter), addImage() will be called
$('#urlBox').submit(addImage);
Controls
This is the heart of our application and this is where we will actually operate on our original image to convert it into something different.
To take values for different filters, we will use range selectors. This will allow us to see the effect of our changes instantaneously. Here’s the code to add two range selectors – one for grayscale and another for blur (for simplicity, there are only two examples here, but the original code has 9 options):
This is the HTML:
<!--Controls for CSS filters via range input-->
<form id="imageEditor">
    <p>
        <label for="gs">Grayscale</label>
        <input id="gs" name="gs" type="range" min="0" max="100" value="0">
    </p>

    <p>
        <label for="blur">Blur</label>
        <input id="blur" name="blur" type="range" min="0" max="10" value="0">
    </p>
</form>
To apply the effects of the changes on the CSS filters whenever a slider value changes, here’s the jQuery:
// Editing image via css properties
function editImage() {
    var gs = $('#gs').val(); // grayscale
    var blur = $('#blur').val(); // blur

  $('#imageContainer img').css('-webkit-filter',
                               'grayscale(' + gs + '%) blur(' + blur + 'px');
}

// When sliders change, image will be
// updated via the editImage() function
$('input[type=range]').change(editImage).mousemove(editImage);
Whenever a slider is adjusted, the editImage() function is called. editImage() first stores the value of the slider in respective variables (gs and blur), and then applies those to the image.
An important point to keep in mind here is the units of the specific filter you are applying. As you can see in the above code, it’s “%” for the grayscale() filter and “px ” for the blur() filter.
Now you can build upon the above code to add all the filters and have your own tiny image editor.
Demo and Full Code
You can view the final image editor with all 9 filters in action here. Or download the full code of the demo on GitHub.
Now that you are aware of all the power CSS provides you to manipulate an image, you should surely give the filter property a try in your next project. If you are interested, you can go ahead and try adding following functionalities to the current app and make it more useful:
- Option to upload an image from desktop.
- Option to download the modified image.
Feel free to fork and send a pull request. Happy to collaborate!
Frequently Asked Questions (FAQs) about Building a Simple Image Editor with CSS Filters and jQuery
How can I add more filters to the image editor?
Our article provides a basic understanding of how to build a simple image editor using CSS filters and jQuery. However, CSS offers a variety of filters that you can add to enhance your image editor. These include grayscale, sepia, saturate, hue-rotate, invert, opacity, brightness, contrast, blur, and drop-shadow. To add these filters, you need to modify the CSS code. For example, to add a grayscale filter, you can use the following code: filter: grayscale(100%);. You can adjust the percentage to control the intensity of the filter.
Can I use this image editor for large images?
The image editor we’ve built in this article is designed for simplicity and may not perform optimally with large images. If you’re dealing with large images, you might need to implement additional features like image compression and resizing. These features require more advanced coding skills and are not covered in our article. However, there are many resources available online that can guide you through this process.
How can I add a text function to the image editor?
Adding a text function to the image editor involves a bit more complexity. You would need to create an input field for users to enter their text, and then use jQuery to draw this text onto the image. This requires knowledge of the HTML canvas element and its associated methods. Unfortunately, our article does not cover this topic, but there are many tutorials available online that can guide you through this process.
Is it possible to save the edited image?
Yes, it is possible to save the edited image. However, this feature is not covered in our article. To implement this, you would need to convert the edited image into a data URL using the canvas toDataURL() method, and then provide a download link for this URL. This requires a good understanding of JavaScript and HTML5.
Can I use this image editor on a mobile device?
The image editor we’ve built in this article is not optimized for mobile devices. To make it mobile-friendly, you would need to implement responsive design techniques, such as using flexible layouts, flexible images, and CSS media queries. This involves adjusting the CSS and HTML code to ensure that the image editor displays correctly on different screen sizes.
How can I add an undo function to the image editor?
Adding an undo function to the image editor requires storing previous versions of the image in an array, and then using a button to revert to the previous version when clicked. This involves more advanced JavaScript and is not covered in our article. However, there are many resources available online that can guide you through this process.
Can I add a preview function to the image editor?
Yes, you can add a preview function to the image editor. This involves creating a separate area where the edited image is displayed in real-time as the user applies different filters. This requires modifying the jQuery code to update the preview area whenever a filter is applied.
How can I add a crop function to the image editor?
Adding a crop function to the image editor involves more complexity. You would need to create a resizable and draggable box over the image, and then use jQuery to crop the image to the size of this box. This requires a good understanding of jQuery UI and is not covered in our article.
Can I use this image editor with other programming languages?
The image editor we’ve built in this article uses CSS and jQuery, which are web-based technologies. If you want to use this image editor with other programming languages, you would need to rewrite the code in that language. This requires a good understanding of both the original and target languages.
How can I add a rotate function to the image editor?
Adding a rotate function to the image editor involves using the CSS transform property. You would need to create a button that, when clicked, applies a rotation transformation to the image. This requires modifying the CSS and jQuery code, and is not covered in our article. However, there are many resources available online that can guide you through this process.
 Vikas Lalwani
Vikas Lalwani is a front-end developer with an eye for design. He loves to play with HTML, CSS, and JavaScript to create tiny apps for fun. You can check out his experiments on his home page.