When I took on the task of developing Google Chrome extensions using Type Script and Angular 4, it seemed quite a daunting challenge; but after puzzling out how to register our Angular app as a Chrome extension, choose the optimum build process and configuration and to use the messaging system, it proved to be a great opportunity to learn some new technologies in depth.
The use of Angular 4 makes the developer’s life easier because the project acquires a well-defined structure. It can can be more easily maintained and enhanced thanks to the modularity of Angular. Also, TypeScript, as a superset of JavaScript, brings the object-oriented programming experience with strong typing to the development of client-side browser-based applications.
This article describes the general approach, the problems I needed to face, and the solution I adopted.
The basics of Google Chrome extensions development is best learned by using its official documentation, so I’ll just give a brief overview and move quickly on to the detail of creating a simple Chrome Extension using Angular 4.
A Chrome Extension can have three distinct front-end components:
- Extension icon (browser action) – this is an icon that is displayed next to the browser’s Omnibox (Google Chrome’s address bar)
- Popup – This is a popup HTML page that is displayed when the extension icon is clicked. It can reference JavaScript and CSS files
- Extension pages – these are HTML pages hosted by the extension. Each page can reference both JavaScript and CSS files
Although the front-end part of the extension is crucial for the end user, the back-end part is more important from the developer perspective. The documentation lists the following elements of the back-end:
- Content script – a JavaScript file that runs in the context of a page displayed in the browser tab. It has limited access to Chrome extension API (eg. it cannot influence other tabs), but it can do a lot of things in context of the page, eg.:
- explore DOM elements
- inject new objects
- read the page’s local storage
- Event page (background script) – a page that runs in the background, that is developed either as and HTML page or as a single JavaScript file. It has full access to the Chrome extension API. It is typically used to receive the requests and send replies to other extension elements. External requests (eg. to external APIs) should be executed in this part.
- Extension/popup page script – a JavaScript file referenced by HTML page hosted by extension. It has full access to Chrome extension API.
Manifest your stuff!
The configuration of our extension needs to be defined in a special manifest.JSON file. In this file, we can define the constituent parts of our extension. It also allows us to specify what kind of privileges our extension requests. The example below shows the manifest structure that defines these access-request elements.
|
1 2 3 4 5 6 7 8 9 10 11 12 13 14 15 16 17 18 19 20 21 22 23 24 25 |
{ "manifest_version": 2, "name": "Test Extension", "version": "1.0.0", "permissions": [ "tabs", "activeTab" ], "content_scripts": [ { "matches": [ "http*://*/*" ], "js": [ "content-script.js" ] } ], "background": { "page": "index.html#/event-page", "persistent": false }, "browser_action": { "default_title": "Open Popup!", "default_popup": "index.html#/popup" }, "icons": { "19": "assets/Icon-19.png", "38": "assets/Icon-38.png" }, "content_security_policy": "script-src 'self' 'unsafe-eval'; object-src 'self'" } |
——————-
manifest.json
Some parts of this configuration needs additional comment:
- Most of the extensions need to have some permissions for access. In our example we want to be able to open new browser tabs and access currently-opened ones. That’s why we define a tabs and an activeTab permission request
- It is mandatory to define the matches parameter for content script node. It allows us to limit the set of pages to which our content script will be added
- The persistent parameter of background script determines if we need our background page/script to run continuously. By setting this param to false we agree that the script will get deactivated when it’s not needed (eg. when the extension is not in use at the moment)
- The content_security_policy node is necessary to run JavaScript files compiled from Angular 4 sources.
Testing the extension locally
Normally, extensions are made available in the Extensions Store. Because we’re just starting with the development, we prefer not to publish our extension there yet. Once we have our manifest file, we can test how it is working locally by turning the developer-mode on in the Chrome://extensions browser page. Having done that, the browser allows us to install the extension by pointing to the location on the hard drive:
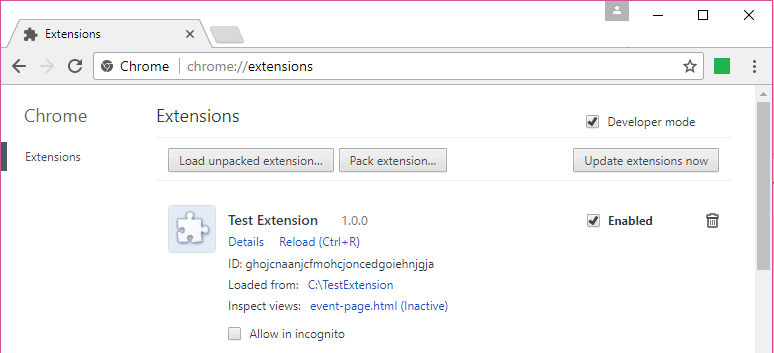
Because we point the path to the location where the manifest file is stored, our extension gets installed. As you can see, the extension id gets assigned to it. You can use it to navigate to HTML pages that are included to the extension – once it’s installed, Chrome is hosting its files. As an example, to open the popup.HTML page you need to go to the following address:
Chrome-extension://[extension-id]/popup.html
JavaScript and CSS files can be referenced in HTML files by relative paths, eg.:
|
1 2 |
<link rel="stylesheet" type="text/CSS" href="popup.CSS"> <script type="text/JavaScript" src="event-page.js"></script> |
Note: Chrome doesn’t treat index.html as the default page when you navigate to an extension address, eg. Chrome-extension://[extension-id]. In order to display a page, you always need to name the file that you want to see.
Introducing Angular 4
There is no out-of-the-box support for Angular 2/4 apps in Chrome Extensions. However, because these apps can be developed in TypeScript, which is then transcoded to JavaScript, it is possible to develop the app that is compactible with the extensions standard.
As the prerequisite, we need to install some software in order to be able to start with Angular development. We will need to install:
- Node JS for Windows
- NPM Package Manager
- Angular CLI (documentation)
The benefit of using Angular CLI is that it allows us to generate new modules, components and services using the command line. We can also generate new Angular application that way:
|
1 |
ng new [project-name] –routing |
A routing flag will ensure that the routing-definition file will get generated to our app. As a result, we get ready-to-use applications with the local GIT repository that can be built (ng build) or served (ng serve). However, before we can use use it, we also need to install the required packages:
|
1 2 |
cd [project-name] npm install |
After building the project, the resulting files can be found in the dist folder. That’s the place where the extension manifest file should also be located. However, it is not a good idea to keep manifest file there, because the dist folder gets removed each time Angular CLI builds the project.
It is better to store the manifest.json file in the src folder and declare it in .angular-cli.json configuration file in the assets node:
|
1 2 3 4 5 6 7 8 |
… "assets": [ "assets", "favicon.ico", "manifest.json" ], ---------------------- .angular-cli.json |
Thanks to this, the manifest file will be always be present in the build output folder.
Manifest your Angular stuff!
As Angular CLI is focused on building single-page applications, it produces a single HTML file (index.html). However, as our application has a routing module, it can contain different content depending on the route. Firstly, let’s set up some components that will be typical for a Chrome Extension:
|
1 2 3 |
ng g component homepage ng g component event-page ng g component popup |
As the result of the component generation command, Angular is automatically creating some files that define a new Component – the most basic building block of an UI in an Angular application. Here’s the example component structure:
- app/homepage/homepage.component.ts – component class definition (back-end part)
- app/homepage/homepage.component.spec.ts – component tests class
- app/homepage/homepage.component.html – an html template of the component (front-end part)
- app/homepage/homepage.component.CSS – a stylesheet for component layout
As you can see, Angular CLI takes care of placing the new files in their appropriate folder. It also generates the basic code in component files, so you don’t need to copy-paste it from previously implemented components.
Having our components initialized, we can use them to provide routing rules in a routing module:
|
1 2 3 4 5 6 7 8 9 10 11 12 13 14 15 16 17 18 |
import { PopupComponent } from './popup/popup.component'; import { EventPageComponent } from './event-page/event-page.component'; import { HomepageComponent } from './homepage/homepage.component'; import { NgModule } from '@angular/core'; import { Routes, RouterModule } from '@angular/router'; const routes: Routes = [ { path: 'homepage', component: HomepageComponent }, { path: 'event-page', component: EventPageComponent }, { path: 'popup', component: PopupComponent }, { path: '', redirectTo: 'homepage', pathMatch: 'full' } ]; @NgModule({ imports: [RouterModule.forRoot(routes, { useHash: true })], exports: [RouterModule] }) export class AppRoutingModule { } ----------------------------- app-routing.module.ts |
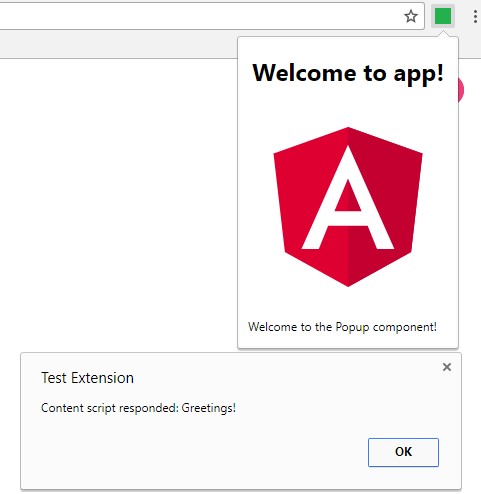
The useHash setting for router module enables routing in old-fashioned way, using the # sign. For example, to open our app routed to the Popup component, we need to use the following URL address:
chrome-extension://[extension-id]/index.html#/popup
Finally, we need to update the extension manifest file. It must point to the appropriate pages:
|
1 2 3 4 5 6 7 8 9 10 11 12 13 14 15 16 17 18 19 20 |
{ "manifest_version": 2, "name": "Test Extension", "version": "1.0.0", "permissions": [ "tabs", "activeTab" ], "background": { "page": "index.html#/event-page", "persistent": false }, "browser_action": { "default_title": "Open Popup!", "default_popup": "index.html#/popup" }, "icons": { "19": "assets/Icon-19.png", "38": "assets/Icon-38.png" }, "content_security_policy": "script-src 'self' 'unsafe-eval'; object-src 'self'" ------------------ manifest.json |
Messaging
We’ve successfully prepared our Angular-based app so that it can be registered as a Chrome extension. Now it’s time to implement some functionality, so that the extension can do something useful.
The Chrome browser delivers the API for extensions. It would be nice to take an advantage of it in our app. We can achieve that by installing Chrome types to our project:
|
1 |
npm install @types/Chrome –save-dev |
To ensure that the project will get correctly compiled once we start using Chrome typings, we need to include them in the tsconfig.app.json file in the compilerOptions/types node:
…
“types”: [“Chrome”]
———————-
tsconfig.app.json
At some point, you might discover that you require some way of connecting between extension elements, allowing particular pieces of the extension to communicate with each other. To make it possible,the Chrome extensions API provides three messaging methods. Here’s a brief description of those methods:
- Chrome.tabs.connect – This opens a communication port to the selected browser tab, such as the currently active one; and allows it to send the message. This can…
- communicate within single extension elements
- define a method to handle an incoming response event
- Chrome.tabs.sendMessage – This sends the message to the selected browser tab, such as the currently active one. This allows us to …
- send message within currently executed extension by default.
- define an ID of the extension, especially to a different one
- define a method to handle an incoming response event
- Chrome.runtime.sendMessage – This sends the message that can be received by any part of the extension such as an event page or content script. This has similar characteristics to the Chrome.tabs.sendMessage
Once the message is sent, it can be received by other part of the extension. The Google Chrome Extension API provides the following message-receiving methods:
-
- Chrome.runtime.onConnect – This allows us to define a listener that receives messages sent through Chrome.tabs.connect communication port. This is typically implemented in a content script that is being executed in a defined set of tabs. The listener receives the message and communication port that allows it to send the response
- Chrome.runtime.onMessage – This allows us to define a listener that receives messages sent through Chrome.tabs.sendMessage and Chrome.runtime.sendMessage methods. It can be implemented in any part of the extension: The listener receives the message, the sender information and the function allowing it to send the response
Missing the content script
As you may have noticed, we’re missing the content script in our project. The problem is that it must be developed as a JavaScript file, whereas the Angular app assets need to be bootstrapped by an HTML tag. Unfortunately, Angular CLI doesn’t provide us a way to easily build selected TypeScript files to separate out the JavaScript asset as long as we are using the standard building definition. Let’s figure out what other options that we have instead:
- We can develop a content script as a JavaScript source file and add it to assets node in .angular-cli.json
- We can develop it as single TypeScript source file without internal modules dependencies and add it to scripts node in .angular-cli.json. Angular CLI builds files defined in that node to scripts.bundle.js file with the dependencies to the code included in inline.bundle.js file
- Develop it as TypeScript application and use 3rd party build tool (eg. Gulp) to compile it.
The decision you take will depend on the project needs. If your content script doesn’t need to have complex logic, the first or second approach might be sufficient. Otherwise, it may be a good decision to define a Gulp building rule.
Building content script with Gulp
At first we will need to install Gulp:
|
1 |
npm install gulp –save-dev |
We will also need to install the following npm packages:
- gulp-typescript
- gulp-sourcemaps
- gulp-uglify
- browserify
- vinyl-source-stream
- vinyl-buffer tsify
Now we can develop the TypeScript modules that we would like to compile as the content script. Let’s develop some logic that will implement the Chrome.runtime.onConnect and Chrome.runtime.onMessage listeners.
|
1 2 3 4 5 6 7 8 9 10 11 12 13 14 15 16 17 18 |
export class ConnectListener { constructor() { this.initializeMessagesListener(); } initializeMessagesListener() { Chrome.runtime.onConnect.addListener(this.onConnectHandler.bind(this)); } onConnectHandler(port: Chrome.runtime.Port) { port.onMessage.addListener(this.onConnectMessageHandler.bind(this)); } onConnectMessageHandler(msg, port) { console.log('Received connection message: ' + msg); const response = 'Greetings!'; port.postMessage(response); } } ------------------------------------------------------ content-script/connect-listener.ts |
|
1 2 3 4 5 6 7 8 9 10 11 12 13 14 |
export class RuntimeListener { constructor() { this.initializeMessagesListener(); } initializeMessagesListener() { Chrome.runtime.onMessage.addListener((message, sender, sendResponse) => { const command = message['command']; console.log('Received runtime command: ' + command); const response = { message: 'Aye!' }; sendResponse(response); }); } ------------------------------------------- content-script/runtime-listener.ts |
|
1 2 3 4 5 |
import { ConnectListener } from './connect-listener'; import { RuntimeListener } from './runtime-listener'; const runtimeListener = new RuntimeListener(); -------------------------------------- content-script/boot.ts |
Finally, we will need to define a Gulp build that will compile our content script to JavaScript file:
|
1 2 3 4 5 6 7 8 9 10 11 12 13 14 15 16 17 18 19 20 21 22 23 24 25 26 27 28 29 30 31 32 33 34 35 36 |
var gulp = require('gulp'); var ts = require('gulp-typescript'); var exec = require('child_process').exec; var browserify = require("browserify"); var source = require('vinyl-source-stream'); var buffer = require('vinyl-buffer'); var uglify = require('gulp-uglify'); var sourcemaps = require('gulp-sourcemaps'); var tsify = require("tsify"); gulp.task('ng-build', function(cb) { console.log('running ng build...'); exec('ng build', function (err, stdout, stderr) { console.log(stdout); console.log(stderr); cb(err); return true; }); }); gulp.task('content-script', function() { return browserify({ basedir: '.', debug: true, entries: 'content-script/boot.ts' }) .plugin(tsify) .bundle() .pipe(source('content-script.js')) .pipe(buffer()) .pipe(sourcemaps.init({loadMaps: true})) .pipe(uglify()) .pipe(sourcemaps.write('./')) .pipe(gulp.dest('./dist/')); }); gulp.task('default', ['ng-build', 'content-script']); ------------ gulpfile.js |
The default tasks consist of 2 sub tasks: the first of them simply performs the ng build command; the second task builds the minified content script to dist/content-script.js file. Now we can bring back the content script to our manifest file:
|
1 2 3 4 5 6 7 8 9 |
… "content_scripts": [ { "matches": ["*://*/*"], "js": ["content-script.js"] } ], ……………... manifest.json |
To build the whole application (including the content script) we can simply use the short command:
|
1 |
gulp |
Sending messages to the content script
Now that we have implemented the content script that handles messages, it’s time to implement the sending part. Let’s do this in Popup component backend:
|
1 2 3 4 5 6 7 8 9 10 11 12 13 14 15 16 17 18 19 20 21 22 23 24 25 26 27 28 29 30 31 32 33 34 |
import { Component, OnInit } from '@angular/core'; @Component({ selector: 'app-popup', templateUrl: './popup.component.html', styleUrls: ['./popup.component.CSS'] }) export class PopupComponent implements OnInit { ngOnInit() { this.connectWithContentScript(); this.sendContentScriptCommand(); } connectWithContentScript = () => { const tabQueryData = { active: true, currentWindow: true }; Chrome.tabs.query(tabQueryData, (tabs) => { const port = Chrome.tabs.connect(tabs[0].id); port.postMessage('Hello!'); port.onMessage.addListener((response) => { alert('Content script responded: ' + response); }); }); } sendContentScriptCommand() { const tabQueryData = { active: true, currentWindow: true }; Chrome.tabs.query(tabQueryData, (tabs) => { const commandMessage = { command: 'salute' }; Chrome.tabs.sendMessage(tabs[0].id, commandMessage, (response) => { const responseMessage = response['message']; alert('Content script responded: ' + responseMessage); }); }); } } ------------------------------------------ app/popup/popup.component.ts |
The messages are getting sent to the content script each time we open the popup. Unless the page browser that is currently displaying matches the pattern that is provided in the manifest file for the content script, nothing will happen. Otherwise the popup will show some alerts:
Summary
Although the task of implementing Chrome extensions using Angular CLI might cause some initial problems, these are easily dealt with. We can then benefit from a nicely modularized app that can easily be enhanced and developed using TypeScript. By combining this with the Chrome API we can develop powerful and fast-working extensions.
Load comments