This article gives you a lightning-speed overview of Svelte - a Javascript framework which lets you write less code, uses no virtual DOM and create truly reactive apps.
As if that's not enough, Svelte is super-intuitive too! Built with developers in mind, it is designed to make coding easier, bug-squashing quicker and a developer's work-life generally happier. If that sounds right up your street, then read on!
While 5 minutes won't be enough to teach you Svelte in-depth, it does allow for a solid overview of the basics, including:
- Components
- Importing and Exporting
- Templating
- Event handling
- Event dispatching
- Reactivity
If you want to find out more about Svelte after reading this article, check out the full course over on Scrimba. There, you'll learn about even more Svelte features and have the chance to road test your new skills with a bunch of interactive challenges.
For now, let's get started on the basics!
Components

(Click the image to access the course.)
First, we'll take a look at how to build a Svelte component, which can contain three parts; <script>, which contains Javascript, <style>, which contains CSS and the HTML, which uses the JS from the <script> tag.
<script>
    let say = 'hi';
</script>

<style>
    div {
        color: red;
    }
</style>

<div>
    Say: {say}
</div>
Note: The bare minimum needed for a Svelte component is the HTML, so the app will still work without the <script> and <style> tags.
Importing and Exporting
One big benefit of using frameworks is the ability to modularise code by splitting it into separate components. Components are then imported into the main app using import keyword:
import Face from "./Face.svelte";
Unlike with other frameworks, the export keyword is not required to use a component elsewhere in an app. Instead, it is used to pass parameters, or props, from parent elements to their children.
For example, we can set a size prop with a default size in our component:
<script>
    export let size = 1;
</script>

<div style="font-size: {size}em">=)</div>
This allows us to easily adjust the size of the imported component over in our App.svelte file:
<script>
    import Face from './Face.svelte';
</script>

<Face size="4" />
<Face size="10" />
<Face />
The various sizes appear on the DOM as follows:

(Click the image to access the course.)
Head over to the course on Scrimba to view and play around with the full code.
Templating
The Svelte templating syntax is a great feature which lets us add if statements and for loops to our HTML.
The syntax for an if statement looks like this:
<Container>
    {#if say}
        <div>
            Hi!
        </div>

    {/if}
</Container>
While a for loop is as follows:
{#each [2,1,0] as faceIndex}
        <Face index={faceIndex} />
    {/each}
Event handling
To allow the user to interact with our app, we need event handlers. In this scrim, we see how to add a simple on:click to a <button> to show our app's header:
<button
    on:click={() => {
        showHeader = true;
    }}
>
    show
</button>
And what a header it is..!
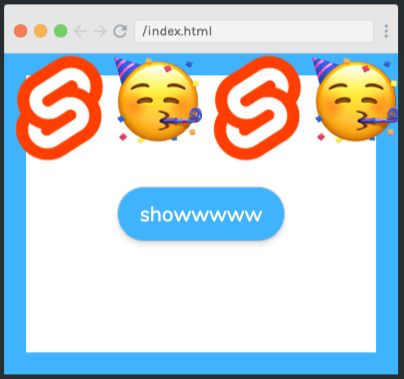
(Click the image to access the course.)
There is a gotcha with this, though - it only works with the native HTML <button> tag and not imported components called <Button>. Luckily, we can work around this by using event forwarding, i.e. adding an on:click to the native <button> tag in its component file:
<button on:click>
    <slot></slot>
</button>
Event dispatching
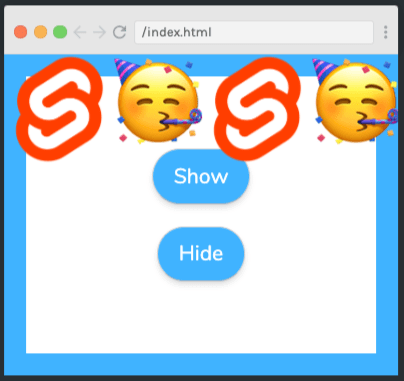
(Click the image to access the course.)
Event dispatching is a great feature of Svelte which increases code usability by allowing us to use the same element for more than one action.
In this scrim, we learn how to use one <Button> component to both show and hide an element.
We create an event dispatcher in the <Button> component file like this:
<script>
    import {createEventDispatcher} from 'svelte'; const dispatch =
    createEventDispatcher();
</script>
We then add the dispatcher to our native HTML <button> like this:
<button on:click={() => dispatch('show')}>
    Show
</button>
<button on:click={() => dispatch('hide')}>
    Hide
</button>
Lastly, we declare the button's functionality options in the App.svelte file as follows:
<Buttons
    on:show={() => {
        showHeader = true;
    }}
    on:hide={() => {
        showHeader = false;
    }}
/>
We can refactor this by passing values up through the dispatch using the event variable (e). In this case, the <Button> in our App.svelte file looks like this:
<Buttons
    on:click={(e) => {
        showHeader = e.detail;
    }}
/>
While the native HTML <button>s in our component file look like this:
<button on:click={() => dispatch('click', true)}>
    Show
</button>
<button on:click={() => dispatch('click', false)}>
    Hide
</button>
Reactivity
If you want a piece of code to rerun every time its associated variable is updated, then Svelte's unique feature, the reactive statement, is for you. We declare a reactive statement with $: as follows:
let score = 0;
$: smileySays = "Hi there, your score is: " + score;
It's also possible to run if statements inside reactive statements. The code to do so looks like this:
let score = 0;
$: smileySays = "Hi there, your score is: " + score;
$: if (score < -4) smileySays = "Wow your score is low!";
That's about all the features we can cram into our 5-minute tour of Svelte. I hope you found it useful and are inspired to try out the framework for yourself and test your new-found skills. Don't forget to check out the full course over at Scrimba to find out about even more Svelte features and give the coding challenges a try.
Wherever your coding journey takes you next, happy learning :)


Top comments (1)
So its besicly react with extra steps